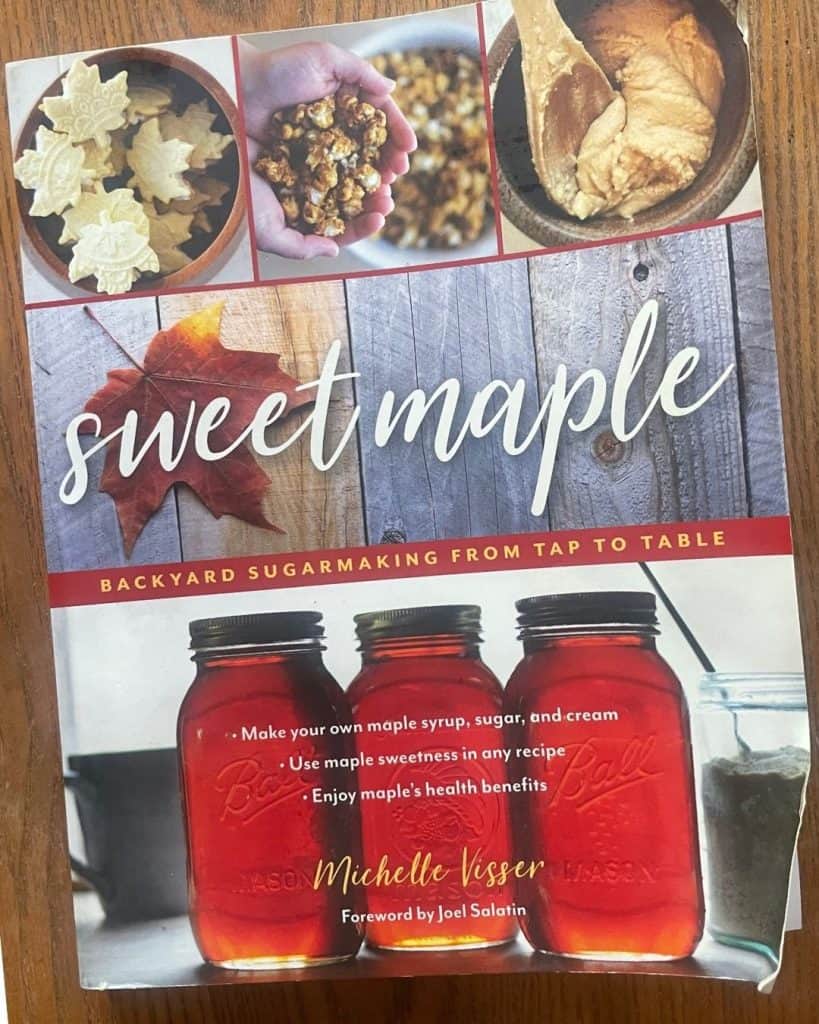
How to Make Maple Syrup the Traditional Way on the Sustainable Homestead
When Philip and I moved to the homestead full-time, our goal was to live as self-sufficiently as possible. While we raise a significant amount of our food, there are staples that we depend on that come from sources outside of the homestead. Making maple syrup is a way to produce another staple product right here on the homestead.
We enjoy maple syrup mostly on our pancakes, however maple syrup is a natural sweetener that can be used in syrup form, but it can also be used to create maple sugar. While there are many fancy and costly methods used to make maple syrup, here we make maple syrup in a traditional way just like my grandfather did decades ago.
What “Traditional” Means on a Modern Sustainable Homestead
Even as a backyard sugar maker, the process of making maple syrup has gotten complicated and can be extremely expensive. The use of reverse osmosis (RO) allows sugar makers to reduce their maple sap significantly by removing a portion of the water from the sap before they begin boiling. Furthermore, many backyard sugar makers boil their maple sap over propane. While I can see the allure of using propane, it also makes that jar of homemade maple syrup extremely expensive.
While my grandfather may have used a fancier evaporator than we do, we make our maple syrup in a traditional way, just like he did. We boil pure maple sap, straight from the tree over a wood fire.
SUMMARIZE & SAVE THIS CONTENT ON
Suitable Trees for Making Maple Syrup
Maple syrup is made from the sap of maple trees. In the simplest definition, sap is the blood of a tree. Sap is mostly water, which contains nutrients, minerals, and sugar that feed the tree. While maple trees are the most popular trees for making syrup, many other varieties of trees produce edible sap. Walnut and birch trees are the most commonly known.
Even among maple species, the sugar content within the sap varies. Sugar maples have the highest percentage of sugar in the raw sap, containing only about 2% sugar. Other varieties like Silver maples, Red maples, Bigleaf maples, Black maples and box elders are some of the most popular choices for tapping.
Here on Kowalski Mountain we tap sugar maples exclusively. We have several other varieties of maple trees here on the farm, but since we have plenty of sugar maples we tap the best first!
Did you know?
A single maple tree can produce between 10 and 20 gallons of sap per tree.
Sugar Season
Before we made the move to Kentucky, we began learning all we could about making maple syrup. I followed many sugar makers in New England, who begin preparing to tap maple trees mid-February. While I thoroughly understood that sugar season is based on the sap flow, rather than a date on the calendar, that did not translate to me that sugar season below the maple belt would be sooner.
Maple sap flows best when the temperatures are below freezing at night but above freezing in the daytime. The freeze and thaw cycle create pressure inside of the tree that allows the sap to flow.
New England sugar makers tap trees from mid-February to April. However, here in Kentucky, our season is earlier and oftentimes shorter. We missed the window our first winter in Kentucky, we were preparing to tap trees in February but needed to be ready a month sooner!
Timing Sugar Season
Honestly when to tap the trees is the hardest part of the entire process! Unlike commercial syrup producers who uses vacuum pumps to extract the sap, backyard maple syrup producers depend on the sap flow.
This gets more challenging in southern locations where the temperatures change more frequently. Unlike more northern states that get cold and remain cold for long amounts of time, we experience temperature fluctuations in that thaw/ freeze cycle as early as December.
Unfortunately you can tap your trees too early. Drilling a hole for a spile creates a wound in the tree. Like all wounds, the tree, begins to put energy into healing the wound as soon as it occurs. If you tap too early, you may get a small early flow, but the tree will heal enough to prevent optimum flow during peak season. You can redrill the holes, but a good sugar maker manages the trees in the sugarbush to ensure the best production over time, not a single season. If you have plenty of sugar maples, consider tapping different trees for an early run and save a group of trees for your main sap run.
If you are new to tapping trees, I recommend finding a local mentor to help you time the season for your area. There are many backyard maple groups online where you can find local producers. I found a small producer here in Kentucky called Ken Folks Farm. While he’s still a bit more northern to us, he was the closest person I could find. That first year I kept one eye on the weather and the other eye on Ken’s account. When he said go, we did!
Watch the entire process of making maple syrup on YouTube! This 4-video series brings you along for the entire process from tapping trees to bottling syrup and making maple sugar candy.
Choosing Maple Trees to Tap
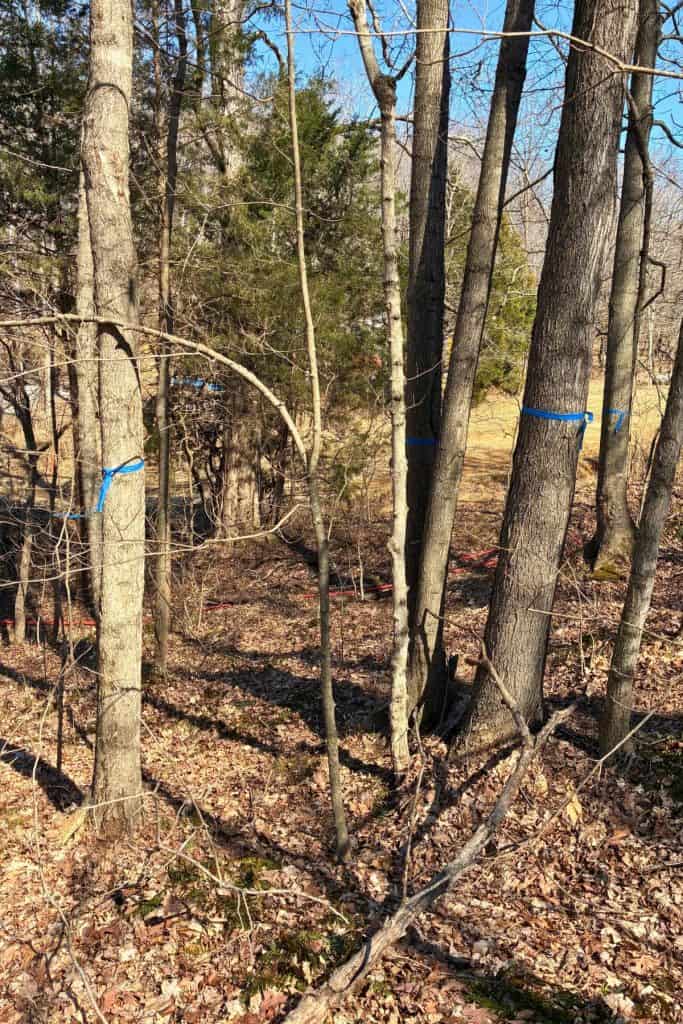
Prior to sugar season, identify the trees you plan to tap. We mark our trees with engineer tape so they are easy to find in winter. The fall is a good time to identify maples when the trees are showing off their fall colors. If you are trying to identify trees in the winter after they have shed their leaves, there are apps that can assist you.
Choose trees that are at least 10″ in diameter. Trees this size can handle a single spile. Remember that maple sap is the blood of the tree. Allow smaller trees time to grow before trying to harvest the sap. Trees that are larger than 18″ in diameter can support two spiles. Trees more than 25″ in diameter can support up to 3 spiles.
Did you know?
On average it takes 40 gallons of sap to make a single gallon of maple syrup. Here at Kowalski Mountain, using only Sugar Maples, we average 50 gallons of sap per gallon of syrup.
Gather Your Tapping Supplies
As sugar season approaches gather your supplies. If you spend anytime researching in online support groups you will learn there are a lot of ways to tap maple trees. I suggest keeping it as simple as possible that first year. Once you have a year under your belt, you can improve upon your process or invest in additional equipment.
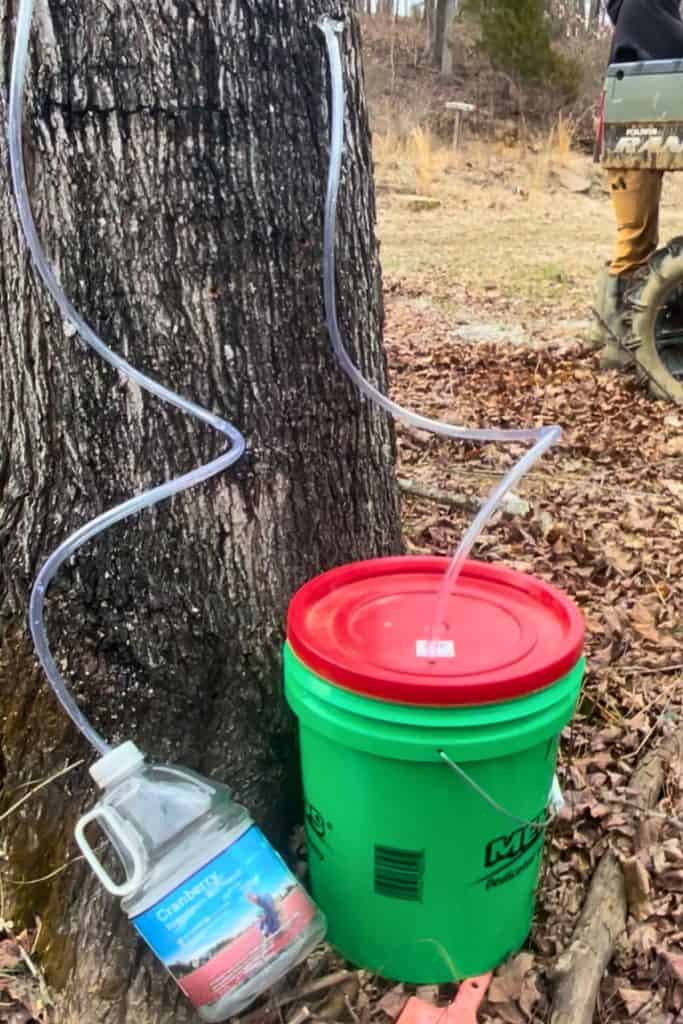
That’s it! In it’s simplest form you need to drill a hole in the tree, insert a spile and collect the sap. People do this with a variety of materials. Maple sap collecting kits include spiles, the drill bit, tubing and sometimes collection bags. We use a combination of 5 gallon buckets for high producing trees and gallon size recycled juice bottles for lower producing trees . While tubing is optional it means we don’t need to hang the buckets on the spiles and it keeps the sap clean.
Recommended Maple Syrup Supplies
Check out our recommended maple syrup supplies in our Amazon Shop!
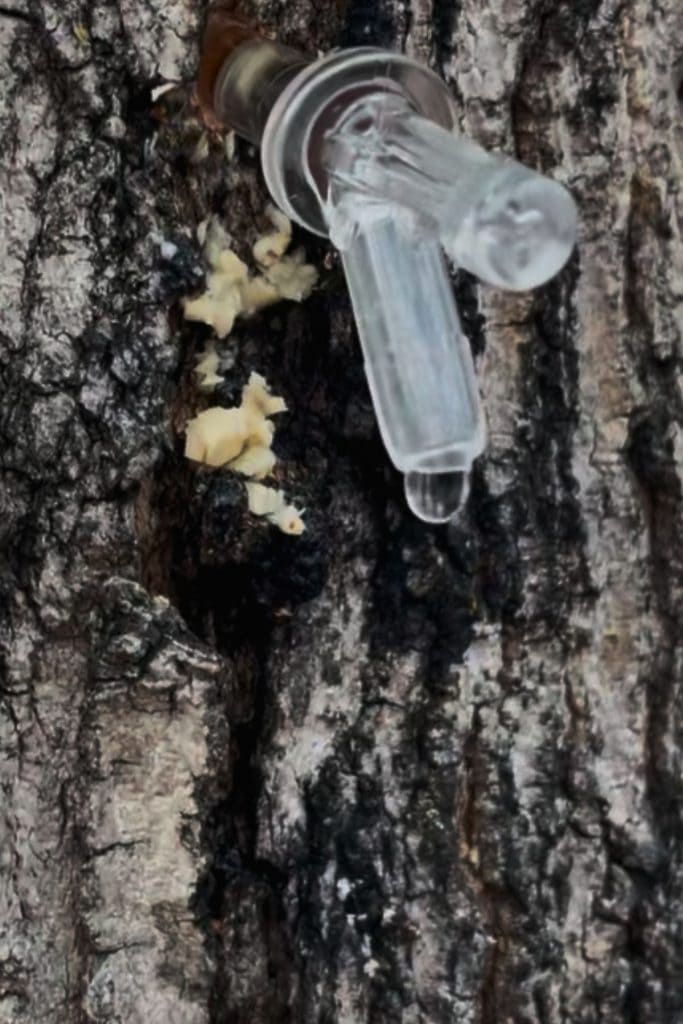
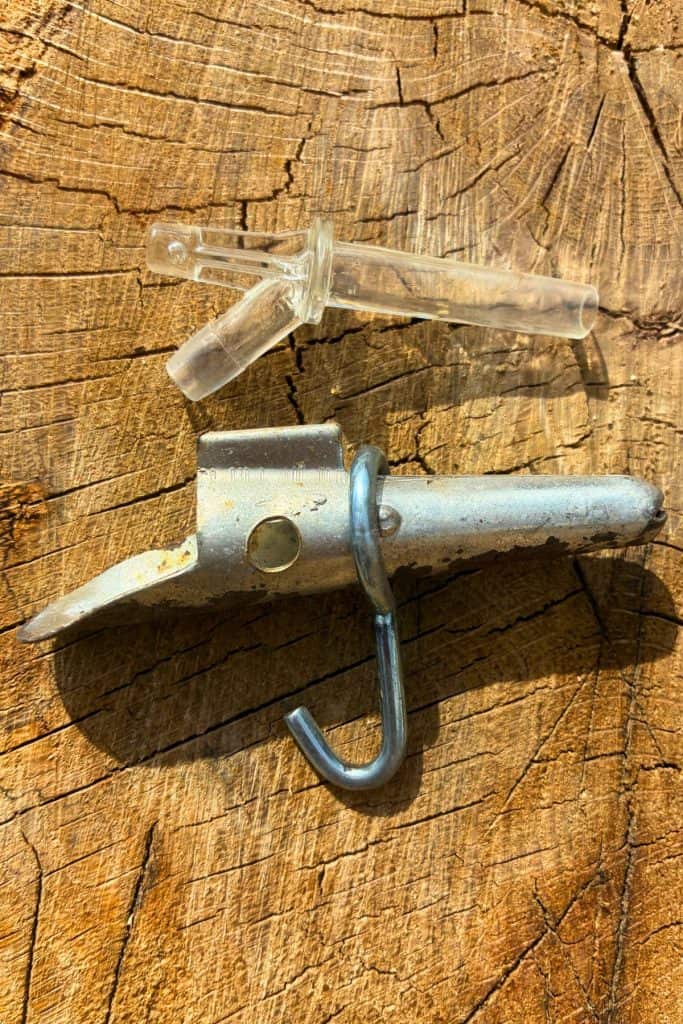
A Word About Spiles
Spiles, also known as spouts are a tube inserted into the tree to allow the sap to be directed out of the tree into a collection bucket. Spiles come in stainless steel, aluminum and hard plastic. These have a variety of designs. Some are designed to hang a bucket from the spile while others are designed specifically for tubing.
Traditionally, the size of spiles were 7/16″ which created maximum sap flow. The wound in the tree can take 2 to 3 years to fully heal. In the mid-1990’s, 5/16″ spiles became widely available. They were marketed as a healthy alternative to 7/16″ spiles. While the sap flow is slightly reduced by 5%, the long term affects on the tree were less invasive. Trees tapped with 5/16″ spiles take 1 to 2 years to heal.
Today 5/16″ spiles are the industry standard however, 7/16″ spiles are still available, especially in metal taps.
We use plastic 5/16″ spiles. We bought these locally at a farm store and these were the only available option. If you order in advance, you will have a much greater variety of spiles to choose from.
Tapping Your Trees
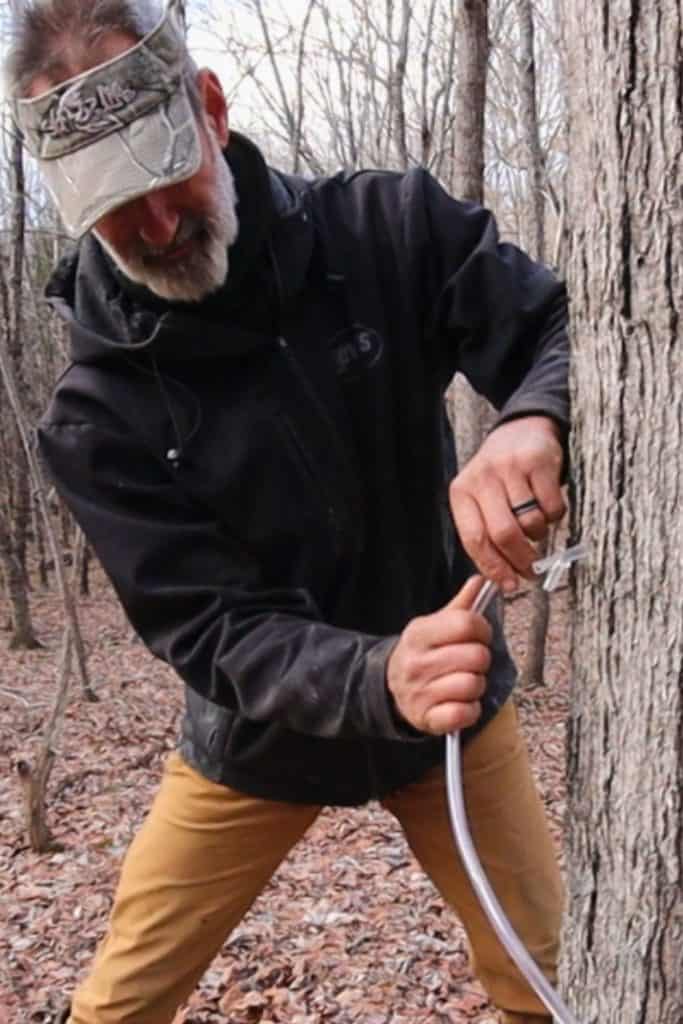
Tapping maples trees is quite simple. Once you’ve identified your trees decide where to drill your tap hole. Whether you should tap on the north or the south side of the tree is highly debated! Philip prefers to tap over one of the main feeder roots on the south/south-west side of the tree.
Trees should be tapped 2 to 4 feet from the ground, but this may vary if you are using a bucket method or a tubing method. The depth of your snow will also be a factor to consider. On average we tap about 3 feet from the ground to use less food grade tubing.
Using a cordless drill, drill a straight hole, angled slightly up to prevent sap from pooling in the hole. Try to drill straight in and straight out. Avoid any in and out drilling motion which can create debris inside the hole. You will want to drill a hole about 1 1/2″ deep. You can mark your drill bit to help you gauge that depth.
Once you have drilled a hole, use a rubber mallet to tap your spile into the tree. Tap gently but firmly until you hear a change in the pitch of the tapping sound. You will hear it when the spile is set securely. Avoid over hammering which can split the tree and cause your hole to leak unnecessarily around the tap. If the sap is flowing, you should begin to see the sap drip from the tree immediately!
Once your is spile is set, attach the tubing if you are using it. Hang your collection bottles or place the tubing into the bucket to begin collecting your sap.

Join us on YouTube our first year making Maple Syrup:
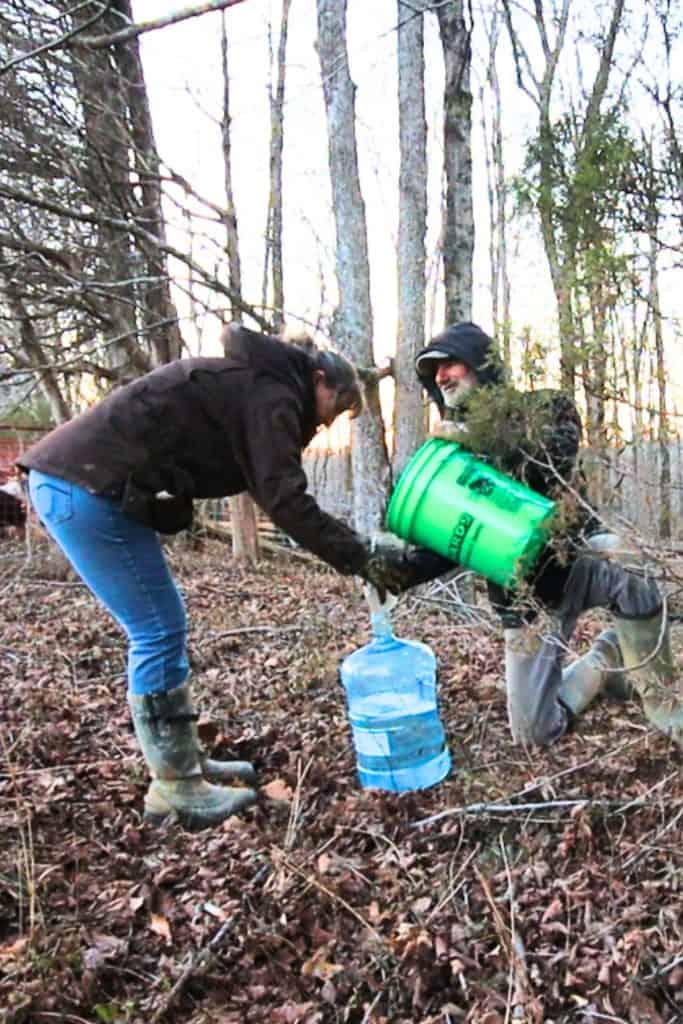
Collecting the Sap
Once the sap starts flowing, sugar season is a busy time! Plan on checking your buckets daily. Maple sap is highly perishable due to its sugar content. Here in Kentucky, we don’t always have snow on the ground to help keep our sap cold. We rely on coolers to keep sap cold until we boil. Depending on your ability to keep sap cold will determine how frequently you need to boil.
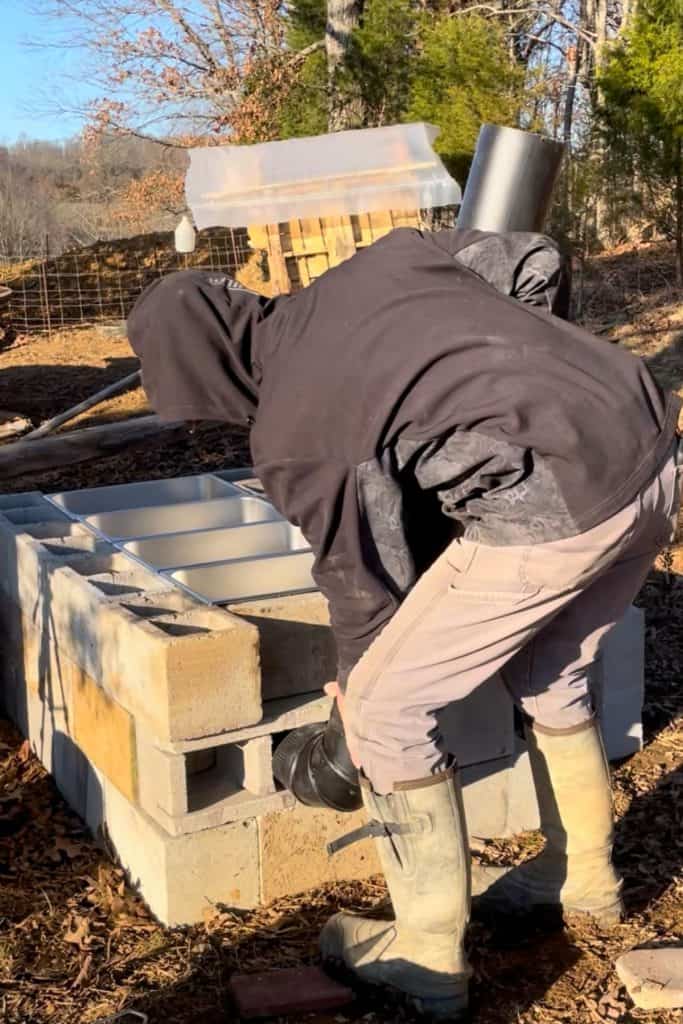
Creating a DIY Evaporator
Once you have enough sap to boil, it’s time to begin making maple syrup. The goal of boiling the sap is to cook off the excess water to concentrate the maple sugar. You can purchase specially designed evaporator pans, but this can be extremely expensive.
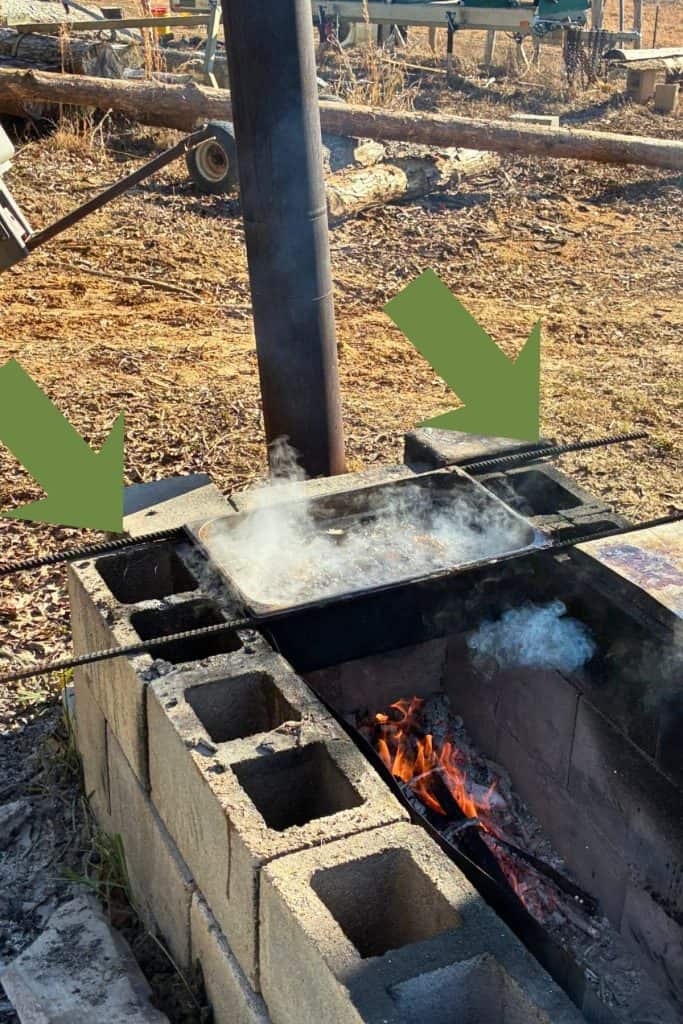
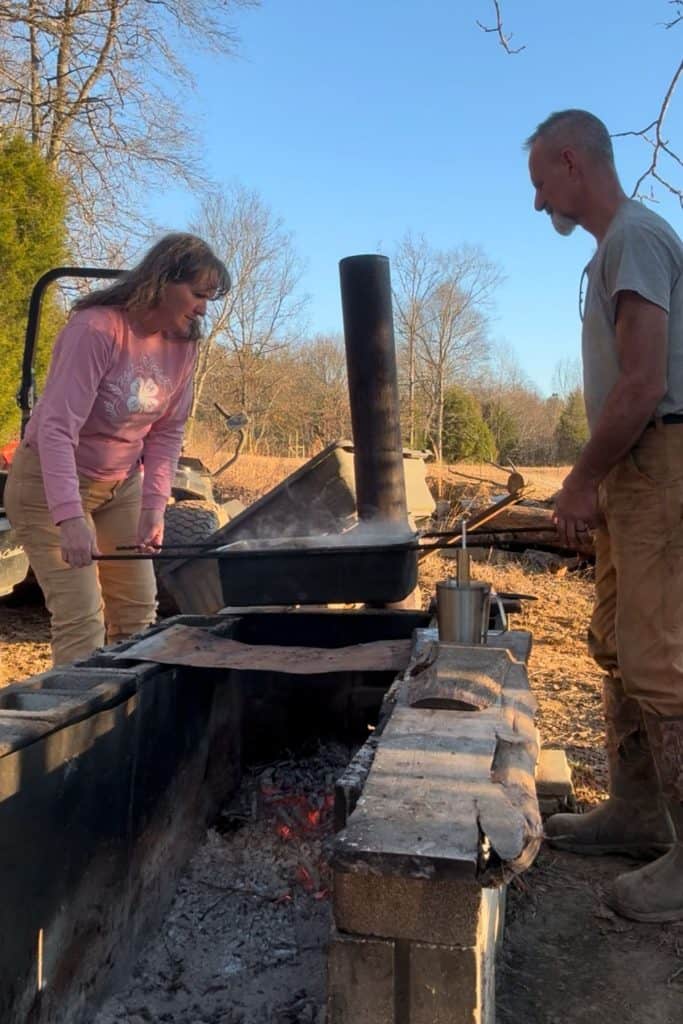
Here on Kowalski Mountain we are a DIY homestead! While we like the right tools to make the job easiest, evaporators come with a big price tag. We choose to make a cement block evaporator using steam table trays. This setup was pretty inexpensive. We already had the cement blocks and stove pipe, the only equipment we purchased were the steam table trays.
The biggest downsides to our set up is that over time, the cement blocks will crack. Most people get a few seasons out of them before they need to replace some of the blocks. The other downside is that the flame reaches the sides of the pan rather than just the bottom. This causes residue on the sides of the pan to burn as the sap evaporates. While this doesn’t change the taste (our syrup does not taste burnt), it does result in darker syrup.
Do I Need a Fancy Evaporator?
While we opted to build a DIY evaporator, as a hobbyist, you don’t need something elaborate. Our first year we had a goal of making 5 gallons of maples syrup. That meant we would need to collect about 250 gallons of maple sap. For us, it made sense to build an evaporator that could boil the sap more quickly.
You can keep this as simple or as elaborate as you want. Some backyard sugar makers boil sap in a single cauldron over an open fire. Sap can also be boiled on turkey fryers using propane. Keep in mind, it takes hours to make maple syrup, and you will use a significant amount of propane.
At Ken Folk Farms, they boil their sap in electric roasting ovens. While this method takes longer than cooking over a fire, it’s a lot less labor intensive for them.
ProTIP: Surface Area Matters
When choosing your boiling pans, remember that surface area matters. The goal is to boil off as much water as possible. Large, shallow pans with greater surface area will evaporate water faster than deep pans with a small surface area.
Boiling the Sap
Start the fire about an hour before you plan to begin boiling the sap. We use a combination of small logs and tree brush. We have found that brush burns hotter and faster in our DIY evaporator than large logs. The perk is that this is a great way to burn branches and brush that normally are not useful for fires. Another thing we like to use is long pieces of brush and logs. Our 4-pan system means we have a large coal bed. The long logs and brush are easier to place under the pans and reach all the way to the back. Logs that are longer than the evaporator are allowed to burn, and then are pushed in further as needed.
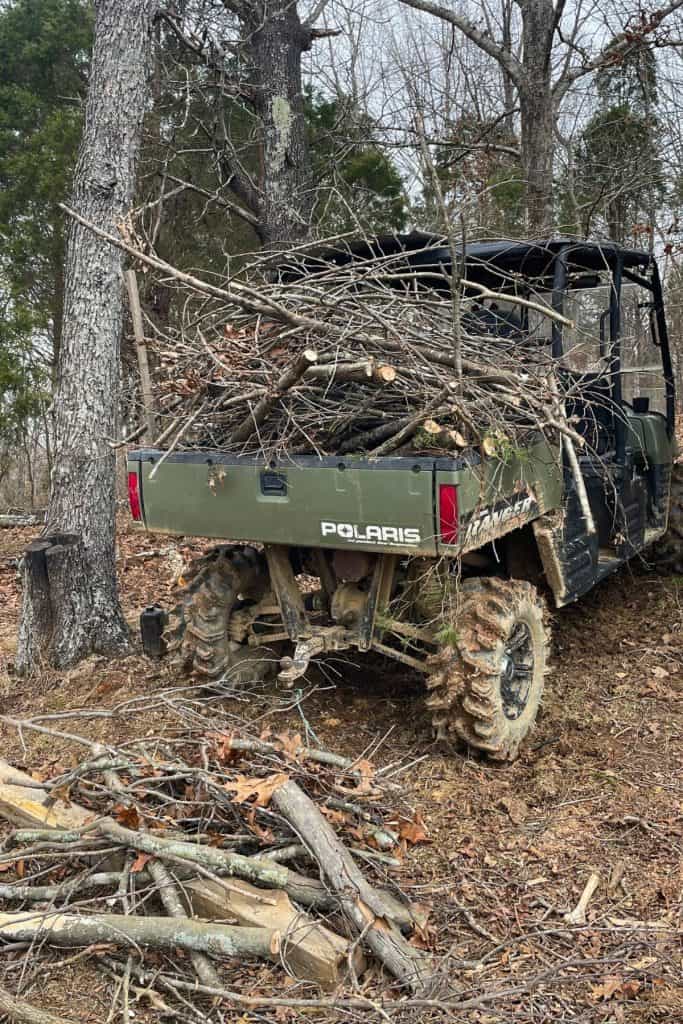
If you are buying wood, plan on at least a half a cord to one cord of wood. This will vary greatly on your evaporator setup, and how insulated your fire is from wind that might slow the boil.
Once your fire is ready, add your pans and fill with maple sap. At minimum you want a pan for boiling and it’s helpful to have a pan for warming sap on the side. It’s best to add warm sap to your boiling pan rather than cold sap, which will slow or even stop the boil.
Keep your pans close to the heat source. You want to boil sap at a full rolling boil. As the sap reduces, add more warm sap and keep boiling until you run out or sap, or out of time!
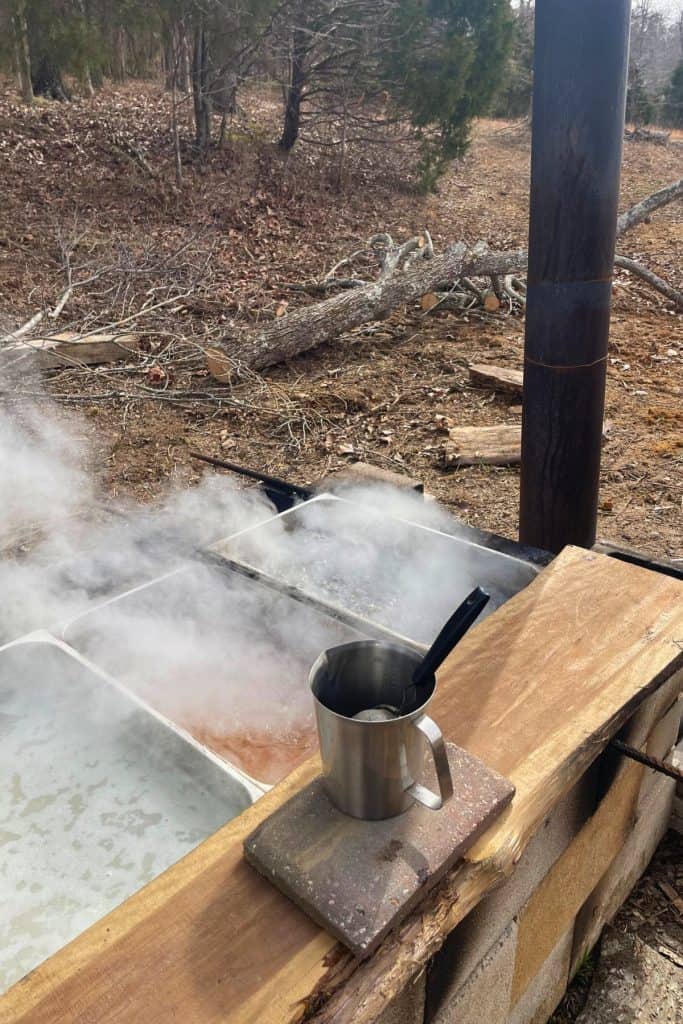
Our Four Pan Evaporator System
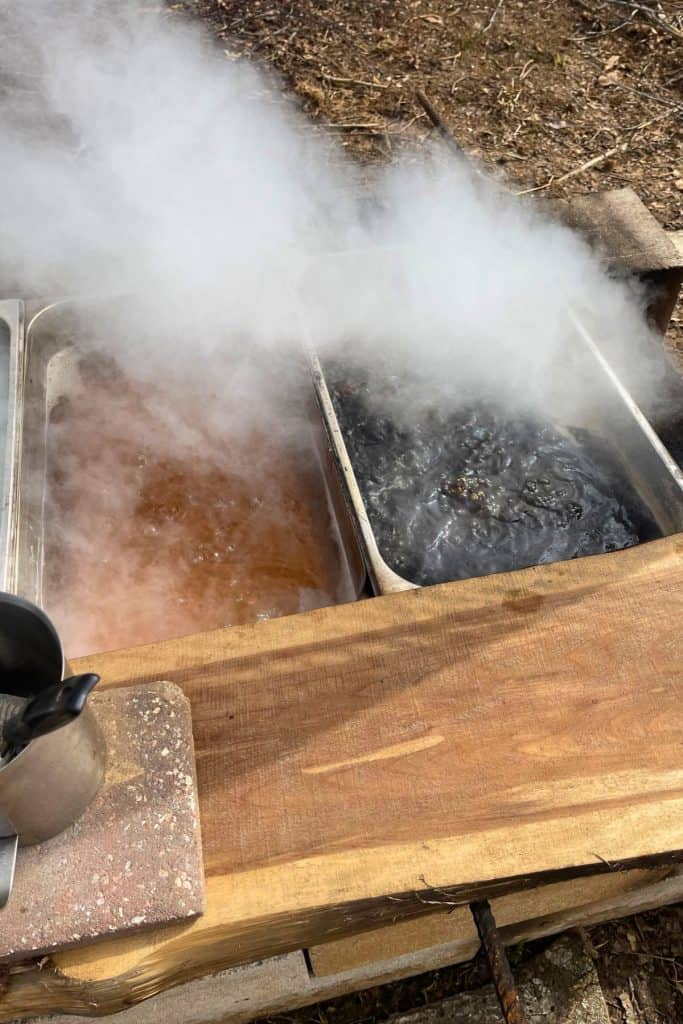
Our DIY evaporator has a 4-pan system. The pan closest to the stove pipe is our main syrup pan. The goal is to reduce all the sap to this single pan. This pan is fitted with long handles that allow us to remove it from the fire easily. The fourth pan, furthest from the stove pipe, is our warming pan. The two pans in the middle are at various stages of boiling.

Throughout the boiling process we transfer the sap from pan to pan to reduce the maple sap.
Breaking Down of the 4-Pan System
I’ve Got a Secret: You know what… the boiling system you use doesn’t have to be complicated. If this 4-pan system overwhelms you, stick to what works for you! The main takeaways: best options include using a shallow boiling pan with a good amount of surface area. Add a warming pan to keep the process going as you add sap.
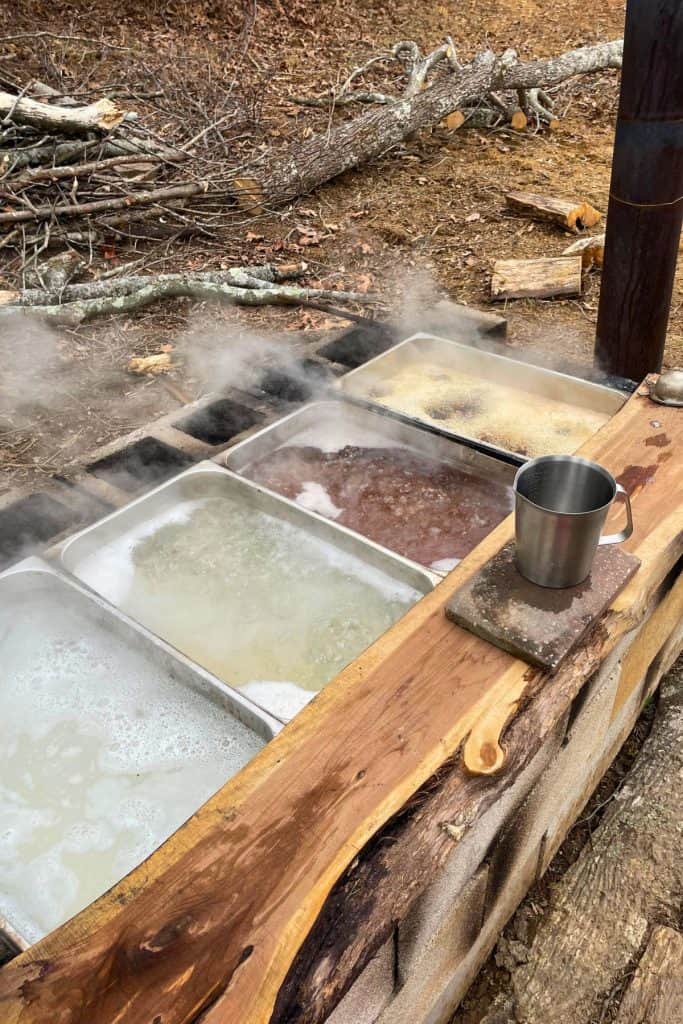
The warming pan is closest to the front, the syrup pan closest to the stove pipe. The sap darkens as the water evaporates.
How Long Does It Take?
Be prepared that making maple syrup takes a very long time! Our first year, we boiled sap for 85 hours over 7 boiling days to make only 5 gallons of syrup!
What to Do While You Wait?
Boiling maple sap over an open fire is an active process. If you are in any backyard maple syrup groups, you may read about people who play cards or read a book while they wait. We have not found that to be possible boiling over an open fire. Especially since we burn brush, we have to keep the fuel coming! Throughout the process, we skim the foam off the top of the pans, transfer sap from pan to pan and keep the fire going.
What If I Need to Stop But the Syrup is Not Done?
If you have to stop, pull the fire. You don’t want to allow sap to boil without you present. If the weather looks good and you have a means to cover the pans, you can leave them where they are.
We usually pull the sap and put it in our pressure canner. Pressure canners are perfect because they have a locking lid and can handle the heat. Since it’s usually below freezing during sugar season, we leave the sap outside on a covered porch to keep it cool. In the morning, refill the pans and start again. (PS. This is a perfect filtering point.) If you need to step away for several days, make sure your sap is cold to preserve your hard work!.
How Do I Know When It’s Done?
Most people finish their maple syrup on the stove using a heat source you can precisely control. This is one of those things that you spend hours working on and then all of a sudden it’s done. Maple syrup tends to boil very fast with tiny bubbles and quickly can overflow. It’s very important to watch your syrup when its close to being done. Under no circumstances should you walk away!
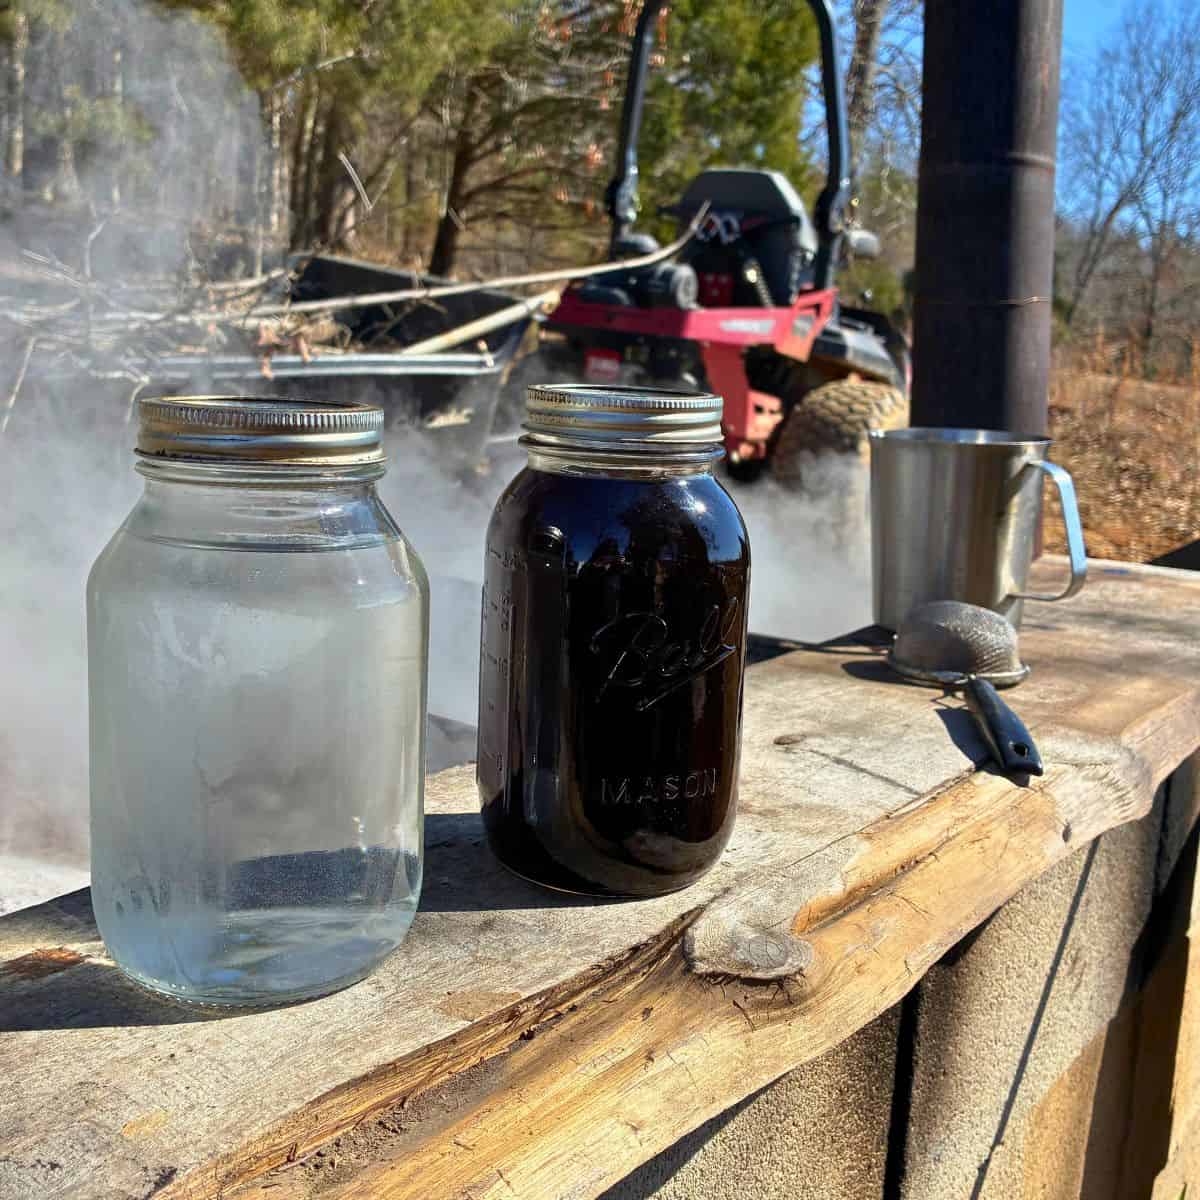
There are several ways to determine if your syrup is done. Some old timers use a spoon method. They trust their eye and experience to know it’s done based on how the syrup coats and drips off the spoon. Here at Kowalski Mountain we use slightly more scientific means by measuring the Brix level or sugar level of the syrup.
Maple sap becomes syrup at 66 Brix. This measurement is important. Maple sap with a Brix measurement under 66 may not store properly, and syrup boiled with a higher sugar content may crystallize in the jars.
Temperature Method
Use a candy thermometer. Maple sap becomes syrup 7 degrees over the boiling point of water at your elevation. For people living at sea level that is 219 degrees. If you are unsure of your elevation, you can do a test by bringing water to a boil and notating the boiling point, then add 7 degrees.

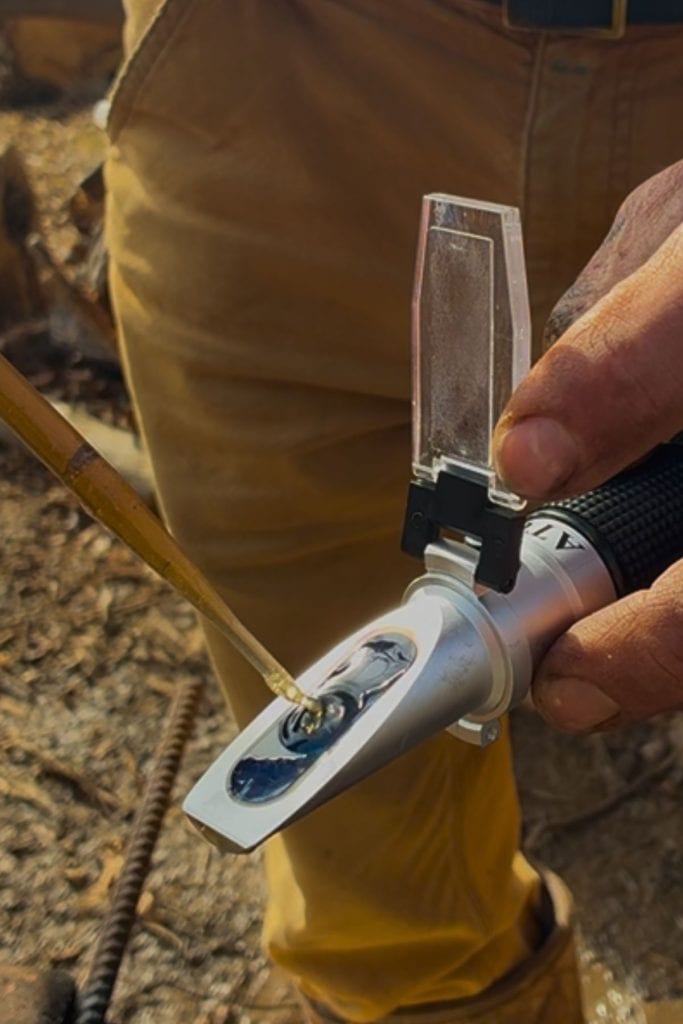
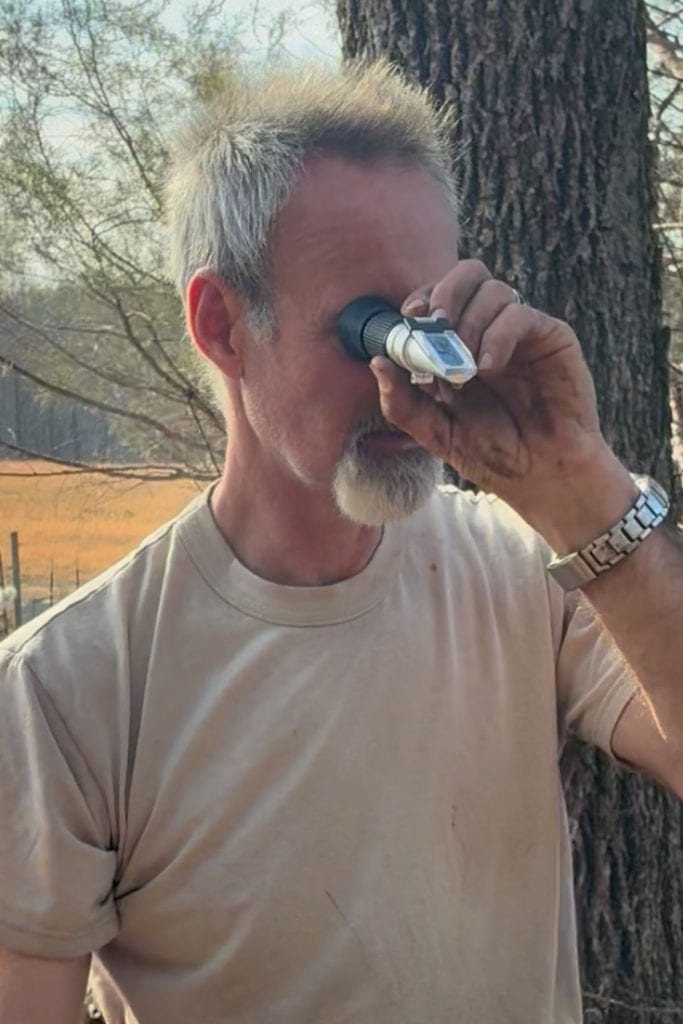
Use a Refractometer
Over the past two years, we have been using a refractometer. A refractometer is a device that refracts light through your syrup to measure the sugar level. We already had a refractometer that we used to test the sugar content of our honey. Not all refractometers are created equal! Some measure sugar content as low as 0%, others like ours have a scale that starts at 58%. While ours works, we would like one that measured at a lower number.
Refractometers are very easy to use. We use a pipet to squirt a little syrup on the lense, close the cover and hold the refractometer up to the light to get a reading. Syrup is done at 66 Brix.
It’s a good idea to test your refractometer by using something such as honey to get an accurate reading.
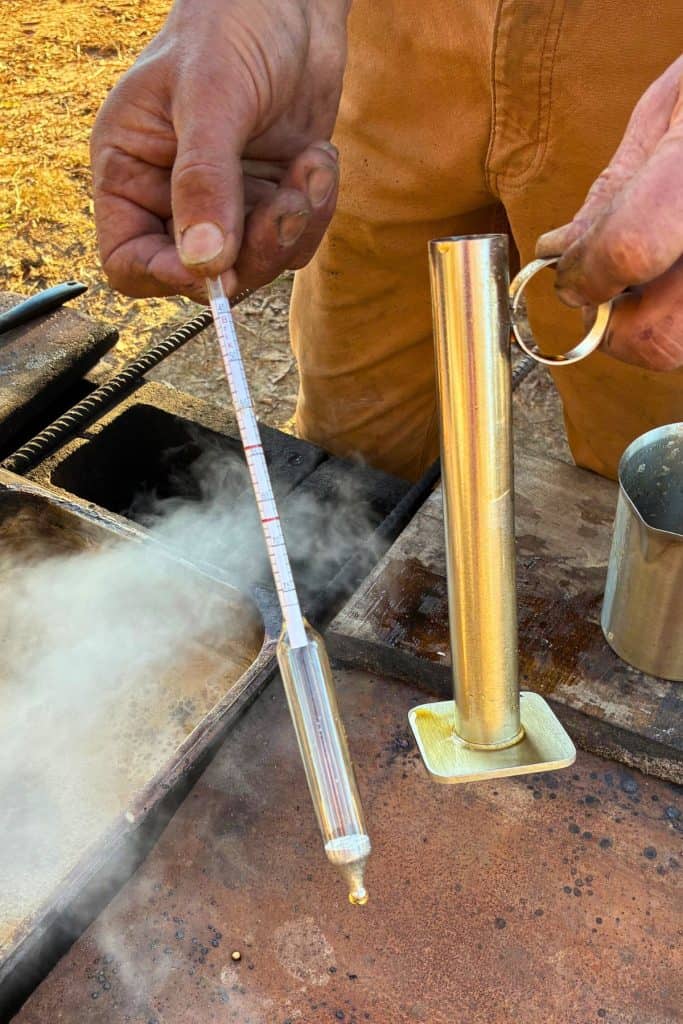
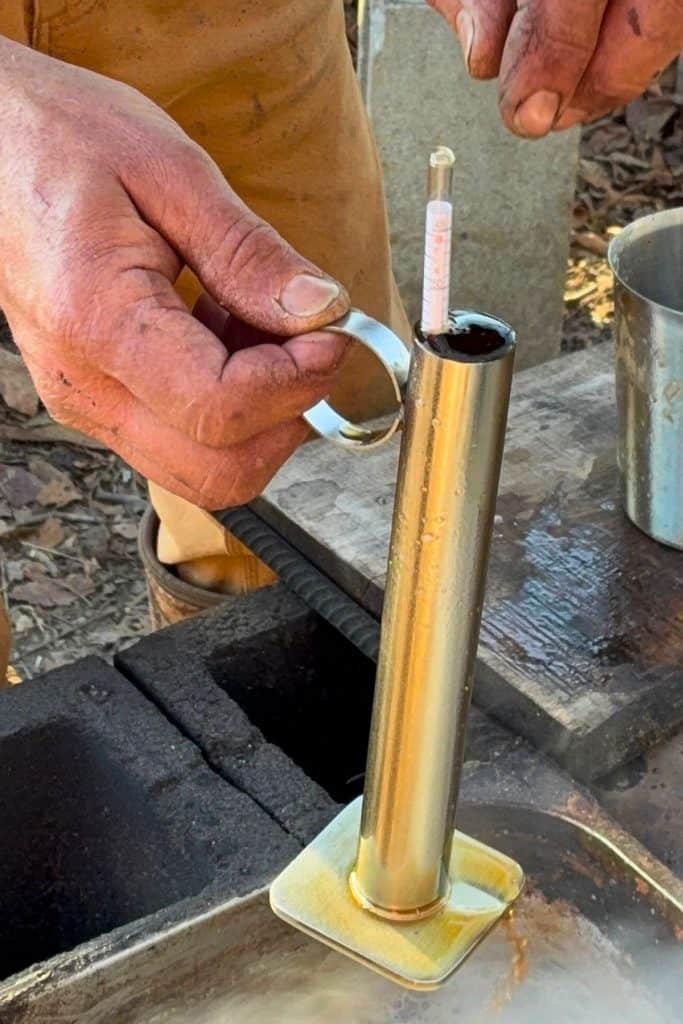
Use a Syrup Hydrometer
Hydrometers are supposed to be most accurate, but they are a bit more cumbersome to use. Our last batch of syrup seemed a bit runny, so we ordered one to try it. The hydrometer comes with a beaker that you fill with hot syrup. Immediately and carefully place the hydrometer into the syrup. Depending on the density of the syrup, the hydrometer will float. The hydrometer has a “hot test” line that if your line is at the level of the syrup surface, it is done. If the line is below the surface of the syrup, the syrup is not done yet, if the red line is above the surface of the syrup it is overdone.
We’ve only used the hydrometer to finish one batch of syrup, and it does seem much messier having to fill the large beaker. The syrup is super thick and looks absolutely perfect!
Fun Fact: My grandfather, Bill Seager, was the sugarmaker for the state school in Vermont over 50 years ago! While I don’t remember him, I love that we are carrying on his legacy as the next generation of sugarmakers in our family!
Our Finishing Method
We finish our syrup on the fire. This is only possible because of the handles that Philip made for the steam tray. He used two pieces of rebar about 4 feet long. One piece goes along each side of the steam tray. Then he used wire to tie the two pieces of rebar together so that they are snug to the steam tray and can not separate.
When the syrup is close, we are both on deck! We keep the fire a bit lower to keep the syrup boiling but at a more controlled level. We take Brix measurements frequently, sometimes every minute. If the boil gets too high, we will use the handles to raise the pan off the fire. If it is still not at the correct Brix measurement, we put the pan back on the fire, but remain ready to pull it off. Syrup will boil over in seconds, you must be ready to act quickly to finish syrup in this way (or any way, boil over can happen inside just as easily)!
Once the syrup hits 66 Brix using your choosing finishing method, the syrup is done and ready for filtering.
Filtering and Bottling
Maple sap should be filtered multiple times throughout the process.
Filtering is an area I would like better tools! Vacuum systems can be purchased or can be made following DIY instructions. This makes the tedious task of filtering syrup a snap!

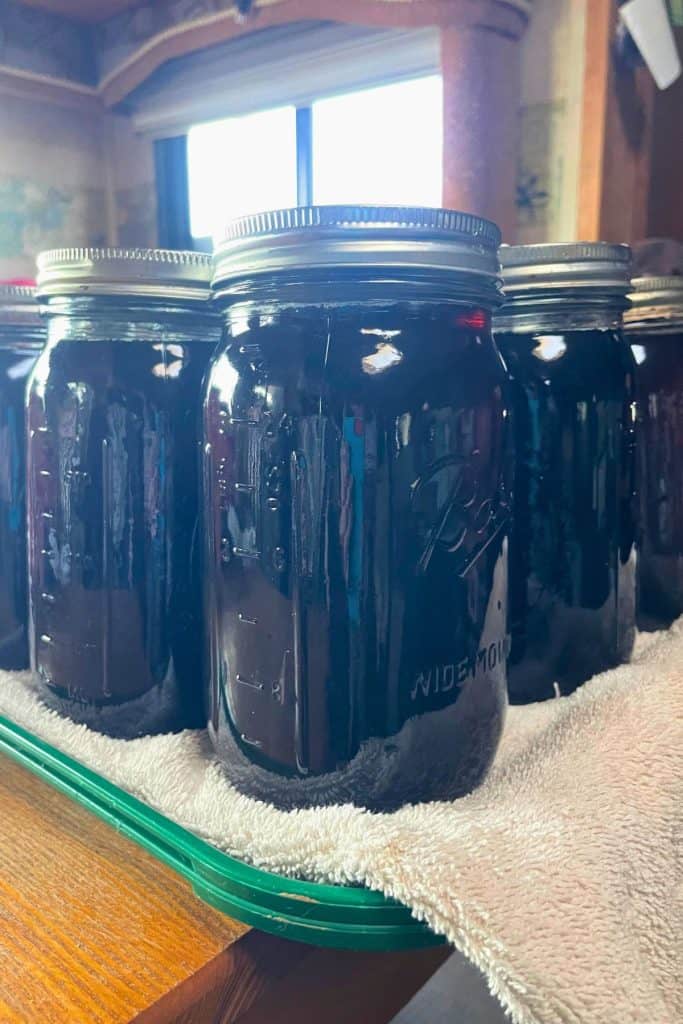
Bottling Your Maple Syrup
If you have made it this far, bottling is extremely exciting! Making maple syrup traditionally over an open fire is a lot of work! The satisfaction of that amber syrup filling the jar is incredible! As with any canning project, hot liquid goes into hot jars. I heat my jars in the oven at 250 degrees. You want them to be dry so not to add water to your syrup.
ProTip: Bottling Caution
Inspect your jars! Check your jars for cracks or chips. Hot syrup will shatter a faulty jar instantly. We were devastated to lose an entire quart of syrup when a jar broke. We prefer regular mouth quart jars. Once opened syrup should be refrigerated. Quart jars fit nicely in the fridge and can be used in a timely manner. These lids make pouring easy!
Heat the syrup on the stove above 180 degrees. Be mindful to not allow the syrup to heat over 190 degrees. Reheating the syrup over 190 can create niter, or sugar sand in your syrup. While it can’t hurt you, it’s not pretty.
Once the syrup is at least 180 degrees, fill your jars. We like to place the jar into a small pan just in case a jar breaks to collect the syrup. We had a jar break only once and had to take the stove apart to clean the spilled syrup!
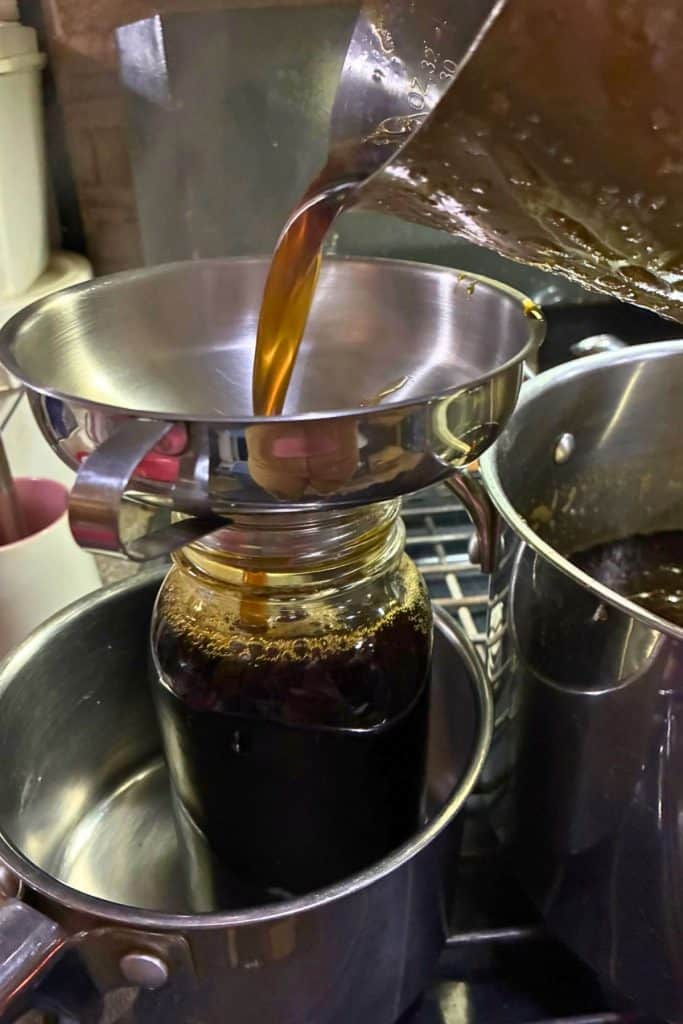
My stainless steal quart pitcher is perfect for filling jars. Use a canning funnel and fill to the top, headspace not required. Once full, add a new canning lid and secure with a canning ring. Place the jars on a towel to cool. The jars will self-seal as they cool. No need to tip the jar to coat the lid, the heat inside the jar will take care of it!
Wrapping Up Sugar Season
To wrap up sugar season, pull your spiles. Wash all equipment with hot water, allow to fully dry and tuck away for next year. I promise, you’ll be hooked! As hard as it is, it’s best to tuck away all your buckets so you aren’t scrambling next season to buy new ones. Though it seems we buy more each year, you can never have enough buckets!
Store your syrup like any pantry staple in a cool, dry place. Open syrup should be kept in the refrigerator.
Lessons Learned From Making Maple Syrup Sustainably
Maple syrup you make yourself just tastes different. Syrup boiled over an open fire has a slightly smoky flavor that we have come to love! That first time you pour homemade maple syrup on your pancakes you will find you pour it a little bit more reverently, knowing exactly the work that went into every drop. I once read that for beekeepers, the bees do all the work making the sweet honey. In the case of sugar makers, you do all the work!
There is no doubt that making maple syrup is extremely time-consuming and rather labor intensive. Our first year we made 5 gallons of smoky, dark amber syrup. At about $60 a gallon to purchase, the $300 worth of syrup we produced lasts us more than a year. As a homestead working towards being as self-sustainable as possible, excess syrup can be made into maple sugar that can be used in our regular baking goods.
Only you can decide if the time invested in making your own maple syrup is worth it. For us, it’s totally worth it! The delicious syrup is so much better than store-bought. While we still buy raw sugar for our canning and baking needs, knowing how to produce syrup on the homestead means that we have the knowledge, equipment and means of producing maple sugar on the farm if we ever needed to! It’s another layer of self-sufficiency skills to add to our homesteading tool kit!

Find this post helpful?
Share it on Pinterest
FAQ
Maple syrup is made from collected maple sap. The maples sap is boiled to reduce the water content. Once the sugar concentration reaches 66 Brix, maple sap can officially be called maple syrup.
Maple syrup is not extracted from maple trees. Trees can be tapped with a spile that allows sugar makers to collect maple sap. Maple sap is a clear liquid that looks like water that contains only 2% sugar. The maple sap must be boiled to make maple syrup.
Making maple syrup is not a difficult process but it is extremely time-consuming. It takes many hours, even days, to make enough maple syrup for a family’s annual maple syrup needs.
Only you can answer this question! Our first year, we made 5 gallons of pure maple syrup valued at $300. We spent 85 hours boiling the maple sap, plus additional time gathering wood, building an evaporator and gathering sap. While the ROI may be low, it’s a very satisifying process to create your own maple syrup and somewhat addictive!

About the Author: Barbra-Sue Kowalski grew up on a small hobby farm. She was always drawn to farm life, however, she was stuck in an urban life far from her roots. Barbra-Sue was a single mom for 13 years, raising her 3 children on her own. She met Philip in 2018 and they married in 2021. Between the two of them, they have 5 grown children and 7 grandchildren. These empty nesters are following their dreams! As they both turn 50, they are building their off-grid homestead to live the life that they dream about. Learn more about Philip and Barbra-Sue here. Contact them here. To leave a comment on this post, please scroll down.