What To Do After Hatching? Practical Tips For Raising Healthy Chicks

Spring is such an exciting time on the homestead! As the farm begins to green up, it’s also a time when babies begin to emerge on the farm! When it comes to chickens, you may be lucky enough to have a broody hen willing to hatch some baby chicks. While it’s adorable to see young chicks foraging with a mother hen, momma chicken’s timetable and yours may not align. An incubator is an easy way to control the hatch numbers and timing of raising chickens on the farm. After you have patiently waited for the incubation period, what to do after chickens hatch in an incubator is an important step to ensure your success!
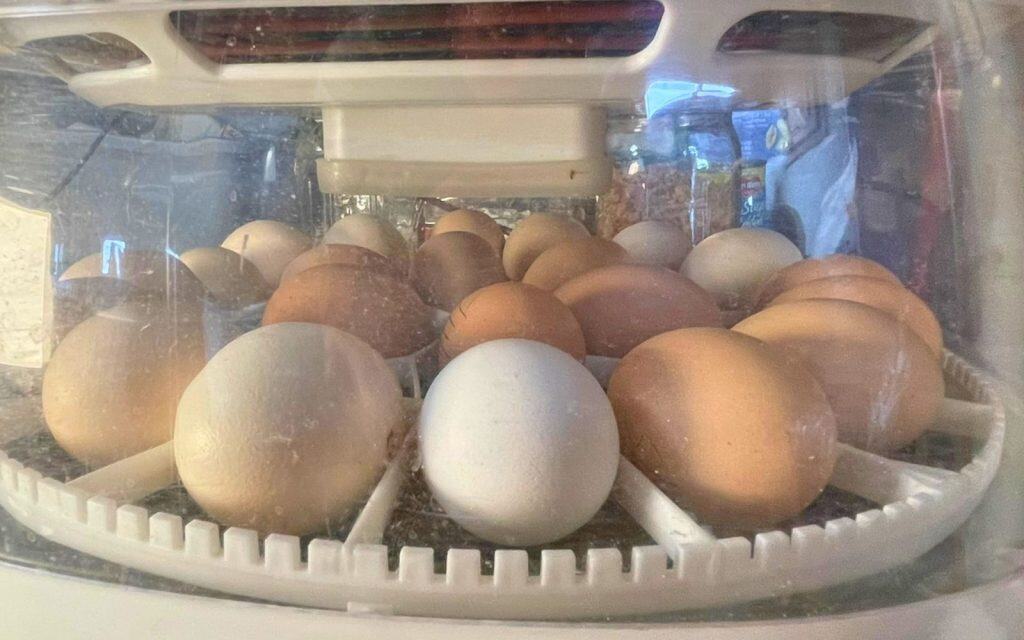
Intro to Incubators
An incubator is a great way to hatch fertile eggs. An incubator is simply a box where the humidity and temperature are controlled to create the optimal hatching environment for hatching eggs. As a kid, I built an incubator with the help of my dad out of a styrofoam cooler. We used a wafer thermostat to control the temperature of the heat source. Throughout the hatching process, I hand-turned each egg several times a day to prevent the developing embryo from sticking to the inside of the shell.
Want to Learn More?
Everything you need to know about choosing an incubator.
These days incubators come in a variety of styles and price ranges to ensure a successful hatch for even novice poultry producers. You can choose from inexpensive still-air incubators to a completely automated forced-air incubator with an automatic egg turner! Newly hatched chicks are not only a fun project for the family, but also a sustainable source of laying hens and meat birds for the homestead.
Start-Up Requirements for Chicks
Brooder: Warm, Dry, Draft Free place safe from predators
Bedding
Heat Source
Chick Sized Feeder
Chick Sized Waterer
The First Chick, Now What?
Chicken eggs take only 21 days to hatch giving you a short time to decide what to do with the hatching chicks. The time will go by quickly, so make a plan to be ready by the hatch date! Newly hatched chicks have very basic needs: a warm, draft-free space, safe from predators. The space, referred to as a brooder box, can be simple or elaborate depending on your needs. Plan to keep chicks in a brooder box until fully feathered and better able to regulate their temperature. Chicks need a minimum of 6 to 7 square inches of space per bird to provide a safe and healthy environment for young chicks. Keep this in mind as you choose your brooder setup.
It’s Magical: Hatching Day Tips
It’s so exciting when chicks begin hatching! As long as the eggs were all put into the incubator at the same time, they should all hatch within a day or so of each other. As the chicks hatch they will stumble around bumping into the other eggs. While I know it’s tempting to help, leave the chicks in the incubator until they are dry and fluffy. Removing a wet chick prematurely can allow them to get chilled. Since chicks receive nutrients from the egg yolk before hatching, they can go 2 to 3 days without food or water, there is no rush to remove them. Even if the chick hatches late in the evening, it’s best to leave them in the incubator overnight rather than move them in the early stages.

Brooder Options
As long as your brooder meets the minimal requirements of a warm, draft-free space, you can get creative when it comes to brooder space. For many years we have used troughs used by cattle producers for brooder boxes. Made of plastic or stainless steel, they make sturdy brooder boxes that are easy to clean. The solid walls ensure that the brooder is free from drafts. Wire can be fitted to make a cover to protect the chicks from predators, such as our house cats! While they are a good choice for an escape-free brooder box, they are a more expensive option and are hard to store in the off-season.


Think outside the box to create a brooder box that works for you! A simple 4-sided wooden box can be constructed with hinges making it possible to fold for storage when not in use. Large rubbermaid totes make great brooder spaces for a small number of chicks. They are easy to clean and inexpensive.
If you like to recycle, double-walled plastic panels, typically used for outdoor signs, can be fitted together into a modular brooder that comes apart easily to store flat when not in use. I’ve even seen people use kiddie pools, though be aware, young chicks will be flying before you know it and the low sides of a kiddie pool should be considered very temporary. Currently, our young chicks are spending the first week or two in a cardboard box in the corner of our RV due to our limited space!

Exception to the Rules
For our cornish cross broilers, we found a traditional brooder box inadequate for their needs. We typically raise 30 to 50 broilers at a time. Since broilers are so messy, it is hard work to keep them clean! Instead, I used step-in poly posts combined with chicken wire to create a brooder area that could grow inside their chicken coop. Wrap the outside of the wire with a tarp to keep the area free from drafts. Cornish cross broilers outgrow a typical brooder box very quickly long before they are fully feathered. Plan on cleaning frequently or moving the brooder area regularly to keep the broilers as clean as possible.
How to Make a DIY Brooder with Step-In Posts
You can find more video tutorials on our YouTube Channel
Keeping Chicks Warm
Keeping chicks warm in their draft-free brooder is extremely important. A heat lamp is easy to mount in a brooder box to provide adequate warmth. Chicks require the brooder temperature to be approximately 95 degrees.

Depending on the room temperature around the brooder will determine how close the light should be to the chicks. In colder areas, the heat lamp should be 18 to 20″ above the chicks. While 24 to 27 inches is more appropriate in warmer areas. A small thermometer will give you an accurate reading to get a baseline of the brooder temperature. However one of the best ways to measure the temperature is to watch your chicks. Chicks that are hot will pant and get as far away from the light as they can in their brooder. Cold chicks will bunch up together as close to the light as possible. Good placement is indicated by comfortable chicks spread out in the brooder box.
While a heat lamp is an inexpensive option be careful with the bulb when it’s lit. The filament inside the bulb tends to be fragile. A bump to the lamp can break the filament making it useless. We usually turn off the lamp if we are going to be doing anything that might jostle the lamp which seems to prevent the issue.
Another Heat Option
Some people prefer heat plates rather than heat lamps. Heat lamps do provide significant heat and can cause fires if placed too close to hay or other dry tinder. Heat plates are considered a safer option. Placed low to the ground almost touching the chicks, the heat plate is designed to simulate a space that the chicks crawl under, much as they would a momma hen. Heat plates come in different sizes based on the number of chicks you plan to keep. As the chicks grow, the heat plate can be adjusted in height. Interestingly, heat plates use less energy than heat lamps though the initial investment is significant.


Brooder Plate or Heating Lamp?
Need help deciding? Check out this complete comparison of the pros and cons of both heating methods.
Bedding for Chicks
Pine shavings are a common bedding used for young chicks. They are inexpensive and available in most farm supply stores. Be aware cedar shavings are said to cause health issues for young chicks, especially respiratory issues. Hemp bedding is becoming a popular option though I can’t say we have tried it. While I love sawdust in my roosting boxes for adult birds, I don’t care for it when it comes to chicks. The manure is too small to sift out with a kitty litter scoop, making it difficult to clean. I suggest saving the sawdust until the chicks are older.
Want to learn more about poultry?


Food and Fresh Water
Chicks are typically fed medicated chick starters for two to four weeks. The medicated starter helps protect healthy chicks from internal parasites. Like all babies, chicks have a fragile, undeveloped immune system. Unlike mammals that receive colostrum and boosted immunities from their mothers, little chicks are more vulnerable. Starter feed is a preventative measure taken to give your chicks the best start possible. While you can purchase non-medicated chick starters, we prefer to practice an ounce of prevention to prevent the devastating loss of chicks.
Like all animals, fresh water should always be available. We add a splash of apple cider vinegar to clean water to further improve gut health to give our chicks their best possible start.
It’s a good idea to use chick-sized feeders and waterers. While the birds can certainly use the larger feeders, they take up too much space in the brooder. We typically use a gallon-sized water container and a quart-sized feeder in our brooders. We feed our chicks as much food as they want with the exception of our cornish cross broilers who need a strict eating regimen.

What to Feed Baby Chickens?
Everything you need to know to feed your new chicks!
Transitioning Outside
While you certainly can keep brooders and chicks outside, you will need to protect them from the weather. Once the chicks are fully feathered you can begin transitioning into a more traditional outdoor space. We like to use puppy play yards, or large dog kennels to give the chicks some outdoor space. If the weather is nice, begin weaning them off the heat lamps. We use the heat lamps as needed at night until the chicks are fully transistioned to the outdoor climate.

Fun for the Whole Family
Raising chicks on the homestead is an amazing experience for the entire family. Since chicken eggs hatch so quickly, it’s a wonderful project to teach children the reproduction basics. Being prepared with a brooder setup ensures a successful experience as you begin to raise your own sustainable chickens on the farm.

Find this post helpful?
Share it on Pinterest

About the Author: Barbra-Sue Kowalski grew up on a small hobby farm. She was always drawn to farm life, however, she was stuck in an urban life far from her roots. Barbra-Sue was a single mom for 13 years, raising her 3 children on her own. She met Philip in 2018 and they married in 2021. Between the two of them, they have 5 grown children and 7 grandchildren. These empty nesters are following their dreams! As they both turn 50, they are building their off-grid homestead to live the life that they dream about. Learn more about Philip and Barbra-Sue here. Contact them here. To leave a comment on this post, please scroll down.


4 Comments