Amazing Twist: It’s a Not-So-Traditional Black Forest Cake Recipe

Traditional black forest cake is a German dessert that gained popularity in the 1930s. Layers of chocolate cake, cherries, cherry brandy, and creamy whipped cream frosting make an impressive holiday dessert. While I am not a fan of cooked cherries, my not-so-traditional black forest cake recipe is a delicious and alcohol-free variation of this classic chocolate cake. A few simple swaps make it my absolute favorite cake! While this cake is a labor of love, this amazing cake is worth the effort! I traditionally serve this cake only at Christmas or very special occasions, making all the effort worthwhile to serve such a gorgeous and delicious dessert to my family and friends.

Classic Black Forest Cake Recipes
Traditional German Black Forest cake is called Schwarzwälder Kirschtorte. The chocolate sponge cake originated in the Black Forest region of Germany. The chocolate cake layers were soaked in a cherry liqueur called Kirsch.
My Not-So-Traditional Variations
While I love fresh cherries, I’m not too fond of cooked cherries. I make this cake with several different variations by swapping out the sour cherry filling with a variety of my homemade jams. Since chocolate cake pairs well with a variety of fruit flavors, the variations can be tailored to your favorite flavor. My absolute favorite jam to use in the fruit layer of this cake is raspberry jam, however I have used strawberry and blackberry jams with delicious results.
Bake with Me! Not-So-Traditional Black Forest Cake Instruction Video
You can find more video tutorials on our Youtube Channel
The Prep
This amazing black forest cake does require quite a bit of prep. Remember this isn’t your everyday dessert, it’s a special occasion dessert. I promise the extra effort is worth it!
The Layer Cake
Admittedly, I usually use a box cake mix for the chocolate cake. While I am working on a homemade variation using cocoa powder, I haven’t found one that meets my expectations yet! Since this cake already is so labor intensive, using a box mix is a shortcut I can live with once a year. It’s the 80/20 Rule. I consider using shortcuts 20% of the time a good balance as a home cook.

Find this post helpful?
Share it on Pinterest
I like to make this cake in round cake pans. Depending on the crowd I am serving, determines the size cake pan I use. For just Philip and me, a 6″ pan is perfect, while 8 to 10-inch cake pans are better for a crowd. This cake is rich, a small piece makes a perfect serving.
Once the cake is baked, allow the cake to fully cool at room temperature on a wire rack. If you plan to decorate right away, slice your cake rounds into two layers each. Be sure to level the top before slicing. Try to slice the cake into as even of layers as possible. Some home cooks may freeze their cake before decorating. This makes the cakes easier to frost with less crumb, it also allows you to bake the cake in advance.
The Sweet Buttercream Layer
Every cake needs a sweet layer! Made with powdered sugar, butter, vanilla extract, and half and half this rich layer has a thick consistency. While this sweet frosting gets an entire layer on the cake, it’s also used on the fruit layer of the cake. A pastry bag is used to pipe a thin layer around the outside edge of the cake to hold the fruit layer in place.

The Fruit Layer
The fruit layer is the heart of this cake! I prefer using my homemade fruit jams to flavor the cake. The jam is already thickened and sufficiently sweet, so it’s unnecessary to add a thickening agent or added sugar to the recipe. Add a bit of almond extract for extra flavor and mix well.


50+ Ideas for the Perfect Homemade Christmas!
Christmas can be a crazy, busy time of year, and it can be easy to miss the magic when you’re caught up in the hustle and bustle. This holiday season, take time to slow down, gather close and celebrate the simple joys that make this time of year so special. I’ve rounded up a heartfelt collection of homemade Christmas ideas from some truly talented and creative friends who share a love for homemade crafts, amazing recipes, and meaningful family traditions.
The Chocolate Layer
While I have used store-bought chocolate syrup, a simple syrup made with cocoa powder and a few common ingredients makes a delicious chocolate syrup for this layer. The chocolate filling is made with heavy whipping cream, chocolate syrup, and vanilla extract for a subtle chocolate creamy layer. Using the whisk attachment on your stand mixer, whisk the heavy cream until soft peaks form. Cover and refrigerate until ready for use. Keep in mind, that this layer is very subtle, it’s not overly sweet. Don’t be tempted to sweeten it up! All the layers work together to create an amazing cake with just the right sweetness throughout!

The Frosting
The frosting on this cake is made with heavy whipping cream. Over the years I have tried to decorate it with swirls of whipped cream on the sides of the cake however I am a big fan of a more rustic look.
You have a couple of options to choose from. You can frost the entire cake with the sweetened whipped cream. Remember it’s a bit more delicate than frosting. It you choose this method, you may want to add just a bit of powdered sugar to help stabilize the whipped cream frosting.
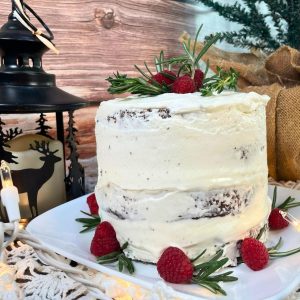
I prefer frosting this cake as a naked cake. This rustic look that became popular in 2014 uses little to no frosting on the sides of the cake. It doesn’t require a lot of technical decorating skills to create a beautiful cake! I do frost the top of the cake, trying to create pretty swirls, then either leave the sides frosting-free, or with a very thin crumb coat. This rustic look is so easy and quite charming. I guarantee you won’t miss the frosting on the sides at all!

My Favorite Mixer
My Bosch Universal Plus Mixer is a workhorse in my kitchen! This powerful mixer gets the job done, no matter how big or small!
Use my code KMOUNTAIN to save $20 (can be combines with select sales).
Prepare the Cake Platter
Now that your cake and fillings are ready it’s time to assemble your masterpiece. Before you place the first cake layer on your serving platter, cut some thin pieces of parchment paper and create an edge around the platter. The parchment paper only needs to be about 3″ wide.
When you place that first cake layer on the platter, the paper will protect the cake platter and keep it clean. Once you are done, you will gently pull the parchment paper out leaving the cake platter mess-free. Be sure that the parchment paper isn’t tucked too far under the edges of the cake base, it just needs to be enough to cover the platter. If it’s tucked too far under the cake it will be difficult to remove. I usually use four pieces of parchment paper for this, but you could use up to 6.
Putting It All Together
Place the first cake layer in the center of your prepared cake platter. To more easily spread the thick buttercream frosting, I put the frosting in a pastry bag. Pipe the frosting on the cake in a swirl pattern. Start at the outside and make a continuous circle working towards the center, Then use a spatula to spread the frosting evenly. By piping the frosting on, it’s much easier to spread.

Next, add the second cake layer. Using the pastry bag, pipe a rim of sweet frosting around the rim of the cake. It needs to be about 3/4″ high. If you are doing a larger cake, you will want to do a second rim about halfway to the center of the cake. I finish with a spot in the center. This is going to create a wall that will hold your fruit layer in place.
Next, spoon the fruit in between the sweet frosting covering the top of the cake. Top with the third cake layer and frost with the subtle chocolate whipped cream. Then add the final layer of cake.

An Ounce of Prevention
I have made this cake for many years, my number one tip when assembling this cake is to stabilize the cake with skewers. Especially if you will be taking this cake to a holiday event outside of the home, the skewers will prevent the cake from shifting. First measure the cake and cut the skewers slightly shorter than the cake itself. You don’t want to see them from the top at all. I like at least three skewers but use your judgment for a large cake. Simply press the skewers into the top of the cake through all four layers until they disappear into the top layer. It’s best to refrigerate the cake at this point for 30 minutes. Allow the cake to set up before frosting. If you’re tight on time, you can stick in the freezer.
Finishing the Not-So-Traditional Black Forest Cake
Once the cake is well set, frost the cake. Choose your frosting style described above. I love the rustic look of a naked cake. This method is highly subjective, add as much or as little whipped cream frosting on the sides of the cake, and it’s perfectly fine to see the cake peek through. I still try to decorate the top of the cake nicely with swirls of whipped cream.

To finish the cake, I like to give in a festive holiday garnish. Depending on the fruit I choose for the fruit layer, I add fresh fruit to match. If I use a raspberry jam, I’ll add fresh raspberries, if I use strawberries, I use fresh strawberries instead. You can create chocolate curls to decorate the cake top. Use a vegetable peeler and slice chocolate shavings off a block of chocolate. Sprinkle them over the top of the cake.
I also like to garnish with fresh herbs like rosemary, thyme, or mint. While they have the look I want, they can flavor the frosting, so add them at the very end just before serving.

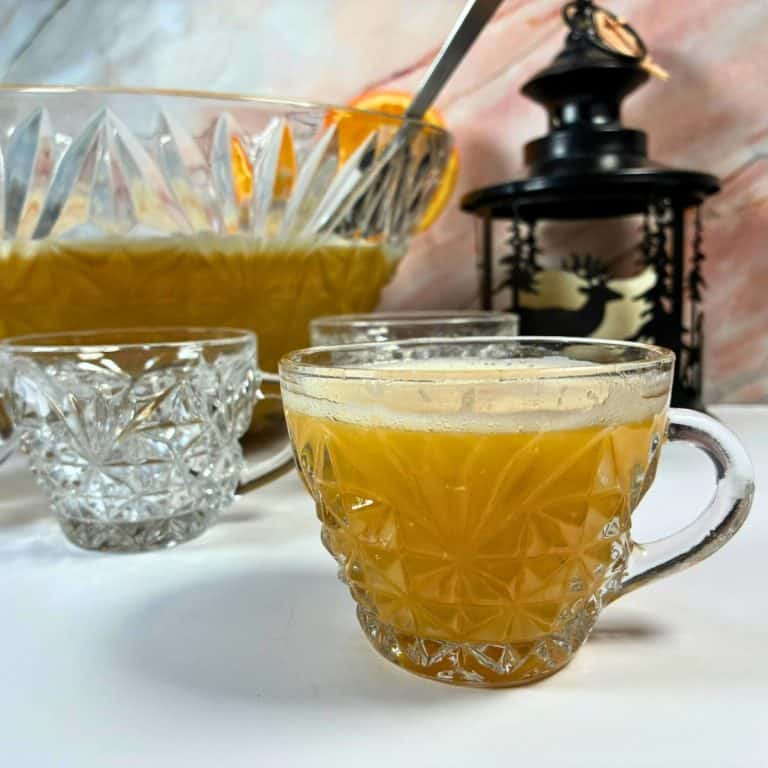
Looking for the Perfect Holiday Punch?
Look no more! This delicious punch is made with real fruit juice! Perfectly sweet, the perfect punch for the entire family from Thanksgiving to New Year’s Eve!
Variations for Serving this Delicious Cake
Over the years I have had many cake-making struggles especially transporting this cake. Before I learned to use skewers to stabilize this cake, I had it tip over a couple of times. Fed up with toppled cakes, I made this cake as a truffle, layering the cake and its delicious frostings in a large bowl. A clear glass or crystal bowl is especially pretty. While this is tasty, the presentation isn’t quite the same. However, if you have any problems baking your cake and end up with broken cake layers, a truffle is a great way to rescue your dessert without having to start over.
It’s Ok to Be Not-So-Traditional
In the past, I would have turned down a cake made with cooked cherries, but I would have missed out on my very favorite holiday cake! The best Black Forest cake is a cake with a flavor profile that you love and enjoy! As a home cook, you get to choose, don’t be afraid to experiment with flavors, you might be surprised by the results!
Not-So-Traditional Black Forest Cake
Equipment
- 3 skewers used to stabilize the cake layers
Ingredients
- 1 chocolate cake mix Use a box mix or your favorite homemade cake recipe.
- any additional ingredients required by your cake mix
Sweet Buttercream Frosting
- 6 tbsps butter softened
- 4 cups powdered sugar sifted
- 1 ½ tsps vanilla extract
- 4 to 5 tbsps half and half
Fruit Layer
- ¾ to 1 cup fruit jam Choose your favorite flavor that pairs well with chocolate: raspberry, strawberry, blackberry.
- ¼ tsp almond extract
Chocolate Whipped Cream
- 1 cup heavy whipping cream
- 1/4 cup chocolate syrup
- 1 tsp vanilla extract
Whipped Cream Frosting
- 2 cups heavy whipping cream
- 2 tbsps sugar
- 1 tsp vanilla extract
Garnish
- chocolate curls
- fresh fruit
- herbs of your choice Caution: they may flavor the frosting, add just before serving.
Instructions
- This specail occasion cake is a labor of love, but I promise you, it's worth the effort! The recipe makes a lot of filling. If you make a smaller cake round (such as 6" rounds) reduce the filling amounts by half.
Baking the Cake
- Bake the cake according to the package or homemade recipe instructions.
- You will need a total of 4 cake layers. Bake two 6 to 10" cake rounds.
- Once the cake is completely cooled, cut each cake round into two layers. This makes a total of four layers of cake.
- If baking in advance, wrap each layer in plastic wrap to keep the cake from drying out. Cake can be frozen before assembling if you choose.
Sweet Buttercream Frosting
- Cream the softened butter in a stand mixer, or with hand mixer.
- Sift the powdered sugar into the creamed butter. Sifting is important to ensure there are no clumps in your frosting. If you don't have a sifter, a mesh strainer works well. Begin mixing the frosting.
- Add the half and half one tablespoon at a time until you reach the desired consitency. This should be a heavy frosting.
- Add vanilla extract and mix throughout.
Fruit Layer
- Measure your favorite jam into a small bowl.
- Add almond extract and mix well.
Chocolate Whipped Cream
- Add the heavy whipping cream, chocolate syrup and vanilla extract to the bowl of a stand mixer.
- Mix until soft peaks form.
- Cover and refrigerate until ready to assemble.
Whipped Cream Frosting
- Add the heavy whipping cream, sugar and vanilla extract to the bowl of a stand mixer.
- Mix until soft peaks form.
- Cover and refrigerate until ready to assemble.
Assembling the Cake
- Prepare a cake platter. Use narrow pieces of parchment paper cut into strips. Place them around the edges of the platter that will tuck just underneath the cake. This will keep the platter clean during the assembly process.
- Place the first cake layer on the center of your cake platter.
- Fill a pastry bag with the sweet buttercream frosting. Note: You can spread the buttercream frosting without using a pastry bag, however it's a thick frosting that does not spread well. If you don't have a pastry bag, you can use a ziplock bag and cut a small hole at one corner.
- Pipe the frosting onto the cake layer in a continuous circle. Start at the outer edge and work your way to the center.

- Using a spatula, spread the buttercream frosting evenly across the cake layer.
- Add the second layer of cake.
- Use a pastry bag to pipe a rim of sweet buttercream frosting around the outside edge of the cake. It should be about ¾" high. This creates a wall to hold the fruit filling in place.
- For a large cake, make a second rim of sweet buttercream frosting halfway to the center of the cake. Also make a small dot in the center. This helps stabilize the jam.
- Next, add the prepared fruit jam inbetween the rims of sweet cream frosting.
- Add the third layer of chocolate cake.
- Frost this layer with the chocolate whipped cream.
- Add the final layer of chocolate cake.
- Cut skewers to be slightly shorter than the height of your cake. Push at least three skewers into the cake to stabilize the layers. They should not be visible from the top. This step is optional, but highly recommended especailly if you will be transporting the cake.
- Chill the cake for at least 30 minutes to allow it to set up before frosting.
- Use the whipped cream frosting to frost the cake to your liking.
- Garnish the cake. If using herbs, add just before serving as they can flavor the frosting.
- Once finished, carefully remove the parchment paper and dispose.
- Enjoy! Be sure to take a picture and tag @kowalski.mountain on Instagram!


Video
Nutrition
Did you make this recipe?
Mention us @kowalski.mountain or tag us using #kowalskimountain so we can see your creations! You can also leave a comment below!
For even more Christmas ideas, you may like these:


About the Author: Barbra-Sue Kowalski grew up on a small hobby farm. She was always drawn to farm life, however, she was stuck in an urban life far from her roots. Barbra-Sue was a single mom for 13 years, raising her 3 children on her own. She met Philip in 2018 and they married in 2021. Between the two of them, they have 5 grown children and 7 grandchildren. These empty nesters are following their dreams! As they both turn 50, they are building their off-grid homestead to live the life that they dream about. Learn more about Philip and Barbra-Sue here. Contact them here. To leave a comment on this post, please scroll down.


While not a fan of cooked cherries, I love this not-so-traditional Black Forest Cake! The sweet jam makes an easy fruit filling. While this cake is a labor of love, it’s worth the time to make a spectacular holiday dessert!