Easy Pressure Canned Chicken for Long Term Storage

Home food preservation is not only a big part of a homesteading lifestyle, but it’s also a great way for any home cook to stock the pantry and saves money. Buying a whole chicken is the cheapest way to buy chicken, but it takes a lot of freezer space to store. Freezer space on the homestead is precious! There never seems to be enough! Pressure canned chicken is a wonderful way to preserve chicken that is shelf-stable and ready to eat! Canned meats are the convenience food of the homestead! It’s perfectly cooked and ready to add to any quick meal. Whether you are taking advantage of a great sale at the grocery store or you raise your own chicken, home-canned chicken is safe and easy to prepare at home in the pressure canner.

What is Pressure Canning?
Pressure canning is used to process all vegetables, meats, broths, and combination foods. Many homestead cooks find pressure canning intimidating in the beginning. However, carefully following the instructions provided with your pressure canner will ensure a safe and enjoyable canning experience.
Pressure canners are specialized pieces of equipment. There are two types: dial-gauge pressure canner and weighted gauge pressure canner. A dial gauge pressure canner has a gauge that displays the pressure inside the canner. A weighted gauge canner uses a weight on the steam valve. Once the canner reaches the proper pressure the weight jiggles and releases steam, maintaining the correct pressure level.

Can I Use a Water Bath Canner?
Pressure canners use much less water than water bath canners. However, the boiling water creates steam inside the pressure canner. The vent pipe of the canner is sealed with a pressure regulator. The pressure builds up inside the pressure canner creating temperatures of 240 degrees. It’s these high temperatures that kill the microorganisms that can cause botulism in low acid foods.
A water bath canner is filled with water and the jars are completely submerged in boiling water. The temperature never exceeds 212 degrees, which is the temperature at which water boils. This temperature is not hot enough to process home-canned meats or other low-acid foods. Learn more about the two canning methods.
Methods of Canning Chicken at Home
There are two methods for canning chicken: the hot pack method or raw pack method. Both will be processed in the pressure canner. When preparing chicken for the hot pack method, you partially cook the chicken prior to canning. You can boil, steam, or bake the chicken until about two-thirds done. You will also add hot broth to each canning jar.
The raw pack method is exactly as it sounds. Fill canning jars with raw meat pieces. Broth or liquid is not required. The chicken will produce its own juices as it processes. Both bone-in chicken and boneless chicken can be used in home canning.
Clemson University indicates that hot-pack canned chicken stores best for long amounts of time due to sufficient liquid coverage. I will admit, it looks more appetizing in the jar once canned. However, I have only cold-packed my canned meats, as I feel it’s easier to prepare.
Preparing the Chicken for Raw Pack
At the homestead, nothing goes to waste. Canning is a great way to use retired laying hens that tend to be tougher when processed. If using freshly butchered chickens, allow the meat to rest just like any other home-processed meat. The meat will need to chill for a minimum of 12 hours. To rest the meat, I keep it iced in a cooler. Be sure to keep it drained and add ice as needed. However, regardless if you raise your own chickens, or purchase raw chicken in the grocery store follow these steps to prepare the chicken for pressure canning.
Remove all excess fat from the chicken. While I try to remove as much of the fat as I can, I don’t worry too much about small amounts that are difficult to remove.

Choosing to leave the skin on the chicken is a personal choice. The skin will create a nice broth as the chicken processes, however, I don’t like the texture of the processed skin. The skin won’t be crisp, like on a baked chicken, more like chicken cooked in boiling water.
Choose Your Cuts: Whole Pieces, Chunks or Bone-In
You have a lot of flexibility in how you process the chicken. Use canned chicken in any recipe that calls for cooked chicken. Think about how you might use the chicken to decide how to best can your chicken. Chicken salad, chicken and rice, chicken tacos, chicken soup, shredded BBQ chicken, and potpies. You can use home-canned chicken in any recipe that calls for cooked chicken.
If you choose, you can prepare whole chicken breasts cut to fit the jars you will be using. You can cut the chicken into pieces to can in chunks. Regardless of the size of the chicken pieces, be consistent in the sizes of your pieces as you cut.
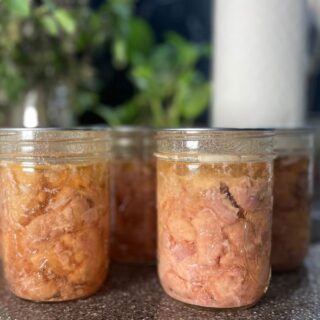
You can also process bone-in chicken. Chicken can be difficult to debone, whole drumsticks or chicken thighs can be canned whole. Choose the jar size appropriate for what you are canning, ensuring you can leave the proper 1 1/4 inch head space required. Bone-in pieces will likely require quart jars. For chunks of chicken, I prefer pint-size jars which are about 2 cups of pressure canned chicken, which is perfect for our family.
Preparing the Chicken for Hot Pack
If you prefer to hot pack your chicken. Cook the chicken two-thirds of the way to prevent overcooking during the canning process. You will also need to prepare a hot broth to fill the jars to the required headspace. Guidelines for cutting up the chicken are the same regardless of which method you choose.
Pressure Canning Supplies
Necessary Supplies for Pressure Canning Chicken:
- Pressure canner
- Clean glass canning jars. Always inspect the rims of the jars for any nicks, chips on the rims, or sharp edges that might prevent the jar from sealing. Gently run your finger over the top of the jar.
- Clean canning lids. Use NEW Metal canning lids designed for one-time use only. OR Harvest Guard Reusable Canning Lids. Reusable canning lids require a little TLC. To use them properly, be sure to follow the manufacturer’s instructions. How do you choose what types of lids to use? Learn more about canning lids here.
- Clean canning rings
- Canning funnel
- Jar lifter
- Tool to remove bubbles and headspace tool (optional)

Due to the high heat and longer cook times, it’s not necessary to sterilize the canning jars prior to beginning. If you are using a recipe that requires the jars to be hot to fill them with hot foods and liquids, I heat them in the oven. Turn the oven on to 200 degrees. After washing the jars in warm soapy water, add clean jars to the oven on a cookie sheet. Allow them to get hot, for about 15 to 20 minutes. If you prefer, you can heat the jars in a large pot of simmering hot water as well. Some homestead cooks even use the dishwasher to heat the jars.
Preparing the Pressure Canner
Before you fill the jars, add the necessary water to the pressure canner. You will need to refer to the instructions in your pressure canner manual for the proper amount of water for your specific model. As a rule, it’s only about 2 to 3 inches of water. Add 1 to 2 tablespoons of white vinegar to prevent mineral buildup on your jars.
Turn the burner on to allow the water to come to a simmer. The warm water in the pressure canner will prevent any jars from breaking due to thermal shock when you add jars with hot food inside.
Filling the Canning Jars
As with all of my canning projects, I always refer to my favorite canning book by the USDA, The Complete Home Canning Guide. This book can be purchased or is available online as a free publication.
Using a canning funnel fill the hot jars leaving 1 1/4 inch headspace. When canning chicken, I find it’s easier to use tongs, rather than a ladle to pack the chicken. If you are hot packing the chicken, add the hot broth. It’s easiest to add a little broth at the start and then fill the jar completely with broth after the chicken is added. If you are cold packing the chicken, additional liquid is not required. Once the jar is full, check the headspace. Using a headspace tool makes this simple. As you become more proficient at canning, you will learn how to eyeball the correct headspace.

When each jar is filled, remove excess air bubbles from the jar. A wooden stick or plastic spoon can be used for this purpose. Simply work the spoon around the inside of the jar, gently compressing the food to push out any bubbles.
Canning Salt
Canning salt or high-quality sea salt is added to home-canned chicken for flavor. The canning process is not dependent on the added salt. You can omit it if you choose. I use Redmond’s salt, as it is pure sea salt with no additives. While you can use table salt for canning, it contains additives that make the water cloudy. Add 1/2 teaspoon of salt to pint jars. If canning quart-size jars, add 1 teaspoon. The salt can be added before you fill the jars or after.

Adding the Lid
Once complete, clean the rim and threads of the jar using a clean, damp cloth. When canning chicken, it is a good idea to use a paper towel that is dampened with white vinegar for this step. Be sure to remove any food, grease, or liquids that may have contaminated the rim of the jar. Any contamination to the rim of the jar can prevent a good seal. Add a new canning lid. Screw on the ring and finger tightened. Learn more about canning lids here.

Starting the Canning Process
Once the filled jars are added to the pressure canner, properly secured the canner lid. Check the manufacturer’s instructions on how to secure your canner. At this time, the vent pipe on the top of your canner is left open to vent, don’t add the weight yet.

Turn the heat of the stove to medium heat and allow the water inside the canner to come to a boil. The canner will begin to vent steam. Wait 10 minutes until the steam forms a constant flow. Once the pressure canner is properly vented, the weight is added. The pressure begins to build in the canner to the required pressure.
Processing Pressure and Time
Remember altitude matters. If you live at a higher altitude above sea level, your pressure canning will be processed at a higher pounds pressure level rather than a longer time. Once the correct pressure is achieved, begin timing the processing. You will need to adjust the stove heat and monitor the pressure of the pressure canner the entire time while it processes. If the pressure drops below the recommended pressure, for safety reasons the processing time must be restarted once the pressure is achieved again.

Proper Cooling of the Pressure Canner
Once the time has expired, the heat under the pressure canner is shut off. Begin the process of cooling the canner. This is an important step that can’t be rushed. Removing the jars too soon can cause temperature shock and cause the jars to break.
Once the pressure has returned to zero, you can remove the weight to allow continued cooling. Wait an additional 10 minutes and unlock the cover and remove carefully using the cover to shield your face from steam inside the canner. Allow the jars of pressure canned chicken to cool for an additional 10 minutes while sitting in the water to continue cooling.

Once the canner has cooled, remove the jars of pressure canned chicken, placing them on a towel-lined surface. Do not tighten bands. You should begin to hear that delightful pinging sound as the jars begin to seal if you are using metal canning lids. If using Harvest Guard reusable canning lids, be sure to follow the manufactures instructions, as the rings will need special attention at this step. Allow the jars to sit undisturbed for 24 hours. If your home is cool, cover the jars with a towel. Visually inspect the lids to determine that they are sealed, you can press on the center slightly to see if it flexes at all. Remove the screw bands and test the seals by trying to lift off the lid. Any jars that don’t seal need to be placed in the refrigerator and used right away.
Cook With Me
Proper Storage
When properly sealed, home-canned food can be stored up to two years. While foods may be safe to eat after this time frame, the quality of food products begins to degrade. Store your pressure canned chicken in a cool, dry place as you would any other dry food storage.

Using Your Pressure-Canned Chicken
Use your pressure-canned chicken in any recipe that calls for cooked chicken. Get creative and try new ways to use the chicken. Remember, chicken salad, chicken and rice, chicken tacos, chicken soup, shredded BBQ chicken, chicken potpie.
Pressure Canned Chicken
Equipment
- pressure canner required
- Clean glass canning jars. Always inspect the jars for any nicks chips on the rims or sharp edges that might prevent the jar from sealing.
- clean canning lids
- clean canning rings
- Vinegar
- Tongs
- ladle
- Jar lifer
- canning funnel
- Tool to remove bubbles and headspace tool optional
Ingredients
- 9 pounds Chicken approximately one pound per pint jar
- 9 tsp Canning or sea salt
- Broth for hot pack only
Instructions
- Freshly butchered chicken should be properly aged at least 12 hours before canning.
- Prepare canning jars by heating jars, and keeping them warm until ready to fill.
- FOR RAW PACK: Remove excess fat and skin (if desired).
- Cut chicken into your preferred sizes. Chunks, slices of whole chicken breasts or bone-in drumsticks and thighs.
- Pack tightly into canning jars. Leave 1 1/4" head space.
- Add canning salt or sea salt if desired. 1 tsp for quarts, 1/2 tsp for pints.
- Remove air bubbles.
- Clean the rim of the jar with a paper towel moistened with vinegar.
- Add a NEW metal canning lid.
- Secure finger tight using a metal ring.
- Processing time and pressure depend on your altitude. See Notes below.
- FOR HOT PACK: Cook chicken two-thirds of the way to doneness.
- Cool enough to handle and cut meat into desired pieces.
- Prepare the broth by warming on the stove.
- Add 1/4 to 1/3 jar of warm broth. Add chicken. Fill the jar, submerging the chicken in broth. Leave 1 1/4" headspace.
- Add salt if desired. Taking into consideration if the broth is salted. 1 tsp for a quart, 1/2 tsp for pints.
- Remove air bubbles.
- Clean the rim of the jar with a paper towel moistened with vinegar.
- Add a NEW metal canning lid.
- Secure finger tight using a metal ring.
- Processing time and pressure depend on your altitude. See Notes below.
Video
Notes
- 0 to 2000 feet in elevation: 11 lbs of pressure
- 2001 ft to 4000 feet in elevation: 12 lbs of pressure
- 4001 to 6000 feet in elevation 13 lbs of pressure
- 6001 to 8000 feet in elevation: 14 lbs of pressure
- 0 to 1000 feet in elevation 10 lbs of pressure
- Above 1000 feet in elevation: 15 lbs of pressure
Nutrition
Want to Learn More About Home Preservation
Successful Canning 101: Water Bath Canning VS Pressure Canning
Choosing the Best Canning Lids: Reusable Canning Lids or Metal
Home Canning: Preserving the Harvest
Water Bath Canning Tutorial Steps to Success
Shop This Post
Presto 23-Quart Pressure Canner (this is nice if you do a lot of canning in pint jars, safe to double stack)
23 Quart Presto Induction Compatible Pressure Canner
Presto 16-Quart Aluminum Pressure Cooker Canner
3-Piece Pressure Regulator 5-10-15lb for Presto Pressure Cooker
Granite Ware 6-Piece Canner Kit
Harvest Guard Reusable Canning Lids creates reusable canning lids that are approved by the USDA. Use my code to get 15% off KMcanning.
Denali Canning Lids Use my discount code for 10% off! BARBRA-SUEKOWALSKI
See all my favorites in the Kitchen Shop

About the Author: Barbra-Sue Kowalski grew up on a small hobby farm. She was always drawn to farm life, however, she was stuck in an urban life far from her roots. Barbra-Sue was a single mom for 13 years, raising her 3 children on her own. She met Philip in 2018 and they married in 2021. Between the two of them, they have 5 grown children and 7 grandchildren. These empty nesters are following their dreams! As they both turn 50, they are building their off-grid homestead to live the life that they dream about. Learn more about Philip and Barbra-Sue here. Contact them here. To leave a comment on this post, please scroll down.
Pin This Image to Help Us Grow


I have ALWAYS wanted to learn how to can meat. Canned meat is so stupid expensive these days. Plus all the additives they use. Thanks so much for this resource!
Great references! Thanks for sharing!
This would save so much time when I go back to work! I think I’ll do this to have some quick easy meals!
Canned chicken makes for fast and easy meals on a busy night! It may not look pretty but it’s tender and tasted amazing!